Pir Motion Sensor Pinout , Connect and control Raspberry Pi motion detector PIR
Di: Samuel
When a person in the field of the sensor moves, it detects a sudden change in infrared energy and the sensor is .How to interface Panasonic PIR Motion Sensor with Arduino. Pin 1: VCC (5 Volt) Pin 2: Out, Data.1) Now, connect your Raspberry Pi GPIO to the PIR motion sensor as per the connection diagram below: Raspberry Pi PIR motion sensor connection. The pins on the PIR are labelled: VCC to pin 2 (5V) OUT to pin 16 (GPIO 23) GND an pin 6 (ground) Software for controlling the Raspberry Pi motion detector. It’s important to note that after powering up the circuit, you should wait for 30-60 seconds to allow the PIR sensor to adapt to the infrared energy in the room. Now, lets learn about the sensor Interfacing with Arduino.Step-by-Step Procedure. It’s also fully . In this tutorial, the basics of Arduino’s hardware interrupt will be explored through the use of a passive infrared (PIR) sensor.
PIR Motion Sensor with Arduino Uno: hc-sr501 Wiring, Setup
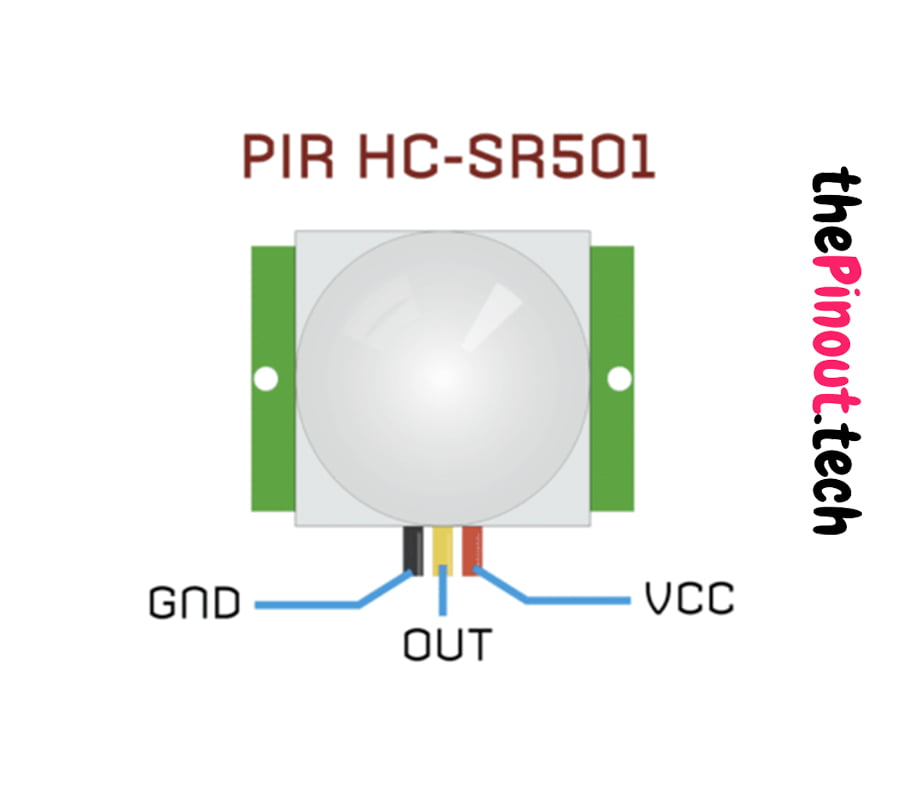
032 cm) Length 1. It can detect if a pin is pulled HIGH/LOW and reports those values to Home Assistant. Este código también se puede utilizar para controlar relés simples para encender o apagar una luz más grande.OUT (Output): This center pin is the PIR sensor’s output signal.
Generic PIR
3V) and can be used to trigger an external circuit or microcontroller input pin. The maximum distance is 3-4 meters during testing. They are often referred to as PIR, Passive Infrared, Pyroelectric, or IR motion sensors. Es gibt PIR-Sensoren, die funktionieren auch mit einer Betriebsspannung von 3,3 Volt. We have powered the PIR sensor using he 5V Rail of the Arduino. Der PIR Motion Detector HC-SR501 hat einen Signal-Ausgang, der zwei Zustände annehmen kann. Overview PIR sensors allow you to sense motion, almost always used to detect whether a human has moved in or out of the sensors range. It might be that the PIR Motion sensor is broken, which can be caused by a .It is commonly used in DIY electronics projects, particularly those involving Arduino boards.To configure ESPHome for use with the PIR sensor, use a GPIO Binary Sensor.The Pi Hut PIR Camera Case for Raspberry Pi 4.Das PIR Bewegungssensor Modul bietet dank seiner Bauweise eine sehr einfache Nutzung, da es die Komponenten schon verbaut hat. This sensor allows you to sense motion, usually human movement in its range. This is a mini PIR sensor, the tiny lil‘ bro of our standard PIR sensor. Connect the GND (-) pin of the PIR sensor to any GND pin on the Arduino. In the Arduino IDE, include the necessary libraries for the HC-SR501 sensor.Connecting to a PIR.

They’re affordable, easy to code, have endless online examples and make some of the coolest projects! Optionally also set a device_class so that Home Assistant uses a nice icon for the binary sensor. The sensor works between 3V-6V.Der Pyroelektrischer Infrarot Motion Sensor kurz PIR (und im folgenden Text auch so benannt) ist ein Bewegungssensor. Quantity: Add To Cart. The passive infrared sensors used here operate at voltages from 2. Image: Description. Schema a blocchi interno dell’integrato BISS0001. Share this: Click to share on Twitter (Opens in new window) Click to share on Facebook (Opens in new window) Click to share on Reddit (Opens in new window) Click to share on WhatsApp (Opens in new window) More ; Post navigation. The Pi Hut 3-pin Sensor Cable. Den Lichtstreifen kann man zum Beispiel unterm Bett .HC-SR501 PIR Motion Detector; GPIO-Belegung (Pinout) Raspberry Pi Pico HC-SR501; Pin 36: 3V3_OUT, +3,3V: VCC: Pin 38: GND: GND: Pin 29: GPIO 22: OUT: Schnell und einfach alle Bauteile zusammen bestellen . I also added an LED in the circuit to illuminate when motion is detected. The setup is very simple since only one pin has to be activated during movement. You should connect VCC to the 3V3 pin (or 5V depending on the model), GND to a GND pin, and the Data pin to a suitable Raspberry Pi Pico GPIO—we’ll connect it to GPIO 22 (take a look at the Raspberry Pi Pico pinout).

The motion state holds false as no motion is detected initially . Most PIR modules have a 3-pin connection at the side or bottom. Raspberry Pi Bewegungsmelder oder Anwendungen in der Hausautomation und/oder im Außenbetrieb (als klassischer Bewegungsmelder) sind damit leichter denn je umzusetzen.Der Sensor bringt folgende 3 Anschlüsse mit. Alat dan Bahan.Function: PIR Motion Detector, Sensor Module( Passive Infrared Sensor ) Package: Module Type.
HC-SR501 PIR Motion Sensor Pinout and Projects
Connect the output pin to any digital pin on .
What is PIR Sensor
Hier lässt sich per Software die Helligkeit und Farbe steuern. Das Programm initialisiert einen GPIO-Pin als . Once your microcontroller is sensing movement, it can trigger a buzzer, text message, tweet .Adafruit Industries, Unique & fun DIY electronics and kits Breadboard-friendly Mini PIR Motion Sensor with 3 Pin Header : ID 4871 – PIR sensors are used to detect motion from pets/humanoids from about 5 meters away (possibly works on zombies, not guaranteed).Pmod PIR Passive infrared motion sensor Features Detect movement up to 5 meters away 6-pin Pmod port with GPIO interface Electrical Bus GPIO.Adafruit Industries, Unique & fun DIY electronics and kits Mini Basic PIR Sensor – BS412 : ID 4666 – PIR sensors are used to detect motion from pets/humanoids from about 5 meters away (possibly works on zombies, not guaranteed). As we need to indicate the detection of motion by the . During this time, the LED may blink intermittently.Drag a PIR motion sensor from the components panel to your breadboard, so its legs plug into three different rows.
PIR Motion Sensor Hookup Guide
In diesem Fall liegt die Spannung eines High-Pegels . Da wir den Sensor mit 5 Volt betreiben wollen, verbinden wir VCC mit einem 5 Volt Pin am Raspberry Pi, zum Beispiel Pin 2. int led = 13; int OUT = 7; Next we will create two variables. They are small, inexpensive, low-power, easy to use and don’t wear out. Then connect the Digital Out Pin of the PIR sensor to the digital I/O pin 8 of Arduino.output( 3, 1) #Turn ON LED.Mini PIR Motion Sensor. You will notice that this code prints . Wie ein Bewegungsmelder genau funktioniert wurde in dem Wikipedia Artikel Bewegungsmelder sehr gut beschrieben.A passive infrared sensor (PIR) is an electronic sensor which is used to detect motion.PIR Motion Sensors.Tutti i moduli PIR sono caratterizzati da tre cavi in uscita da tre PIN in uscita disposti sul bordo della scheda.Arduino PIR Sensor Circuit. Raspberry Pi Pico: WS2812-RGB-LEDs programmieren.The wiring between the HC-SR501 PIR Motion Sensor and the ESP8266 or ESP32 has a major difference compared to the wiring for the Arduino, because we do not use the standard pins for the power .
PIR Sensor : Circuit, Working, Interfacing, Differences & Its Uses
First, we will define the Arduino pin through which the onboard LED is connected.
Arduino
For that reason they are commonly found in appliances . The HC-SR501 module typically has three pins for connection:.3V Physical Width 0. Specification Version 1. The PIR motion sensor has three pins: VCC, GND, and Data. Rangkaian di atas merupakan rangkaian untuk sensor PIR sebagai alarm rumah / alarm anti maling dan sebagainya.The design of the PIR Motion Sensor using Arduino is very simple.Arduino – PIR Sensor – PIR sensors allow you to sense motion. The output pin will provide a digital signal whenever motion is detected.The circuit Diagram for arduino motion detector project by interfacing Arduino with PIR module and blinking an LED/Buzzer is shown in the below image. Come è possibile vedere dalle immagini prese direttamente dal datasheet, il BISS0001 integra on device alcuni stadi di amplificatori operazionali per il condizionamento del segnale ottenuto dal sensore piroelettrico. The output pin of the PIR Sensor is connected to the 2 nd digital pin of Arduino. They are used to detect whether a human has moved in or out of the sensor’s range. We’ll also add an LED . PIR Sensor contains 3 pins, which are VCC, Input pin and ground.
Connecting to a PIR
They are commonly found in appliances and gadgets used at home or for businesses. It is important to verify the correct pin configuration to avoid breaking the motion sensor. In this guide we will use GPIO13 as the pin that the PIR output is connected to. Working Principle. Vcc This pin is used to provide power to the sensor module.Betriebsspannung und Signalausgang. Connect the OUT pin to the Arduino pin 3 (any interrupt pin).Sensor de movimiento PIR HC-SR501 con código de ejemplo de Arduino UNO. When the PIR sensor detects motion, the OUT pin will go high (3. Also, we will define the Arduino pin through which the PIR motion sensor’s OUT pin is connected. Ansicht des Pyroelektrischer . It also features adjustable sensitivity and delay time settings, allowing you to customize the sensor’s behavior to suit your specific . PIR sensors are one of the most popular sensors used with the Raspberry Pi and Arduino projects. Con el siguiente código de ejemplo, puedes leer el sensor y controlar el LED de la placa del Arduino (conectado al pin 13).
Step 2: Connect the output pin. Special note:.If you have a different type of PIR Motion sensor, chances are, it might have a different pin configuration where the + and – pins are interchanged. Beispielsweise, um ihn im Rahmen einer Alarmanlage zu einzusetzen. A PIR sensor includes two main parts like pyroelectric sensor and fresnel lens. I used digital pin 2 of the Arduino to connect the Sensor.PIR Motion Sensor (JST) SEN-13285. The sensor measures infrared (IR) light radiating from objects in its field of view. The output of the PIR sensor is HIGH and LOW which means it has zero or 5 volts. This sensor is much smaller than most PIR modules, which makes it great for .
Raspberry Pi Bewegungsmelder PIR anschließen und steuern
Raspberry Pi Pico: Detect Motion using a PIR Sensor (Arduino IDE)
Using the PIR sensor is simple: power it up, connect a pull-up resistor to the open-collector signal pin, and watch for it to go low.
Arduino PIR Motion Sensor Tutorial
Arduino PIR Motion Sensor Interfacing Circuit Diagram. Power is usually 3-5VDC input but . So connect its VCC Pin to 5V/3.
Connect and control Raspberry Pi motion detector PIR
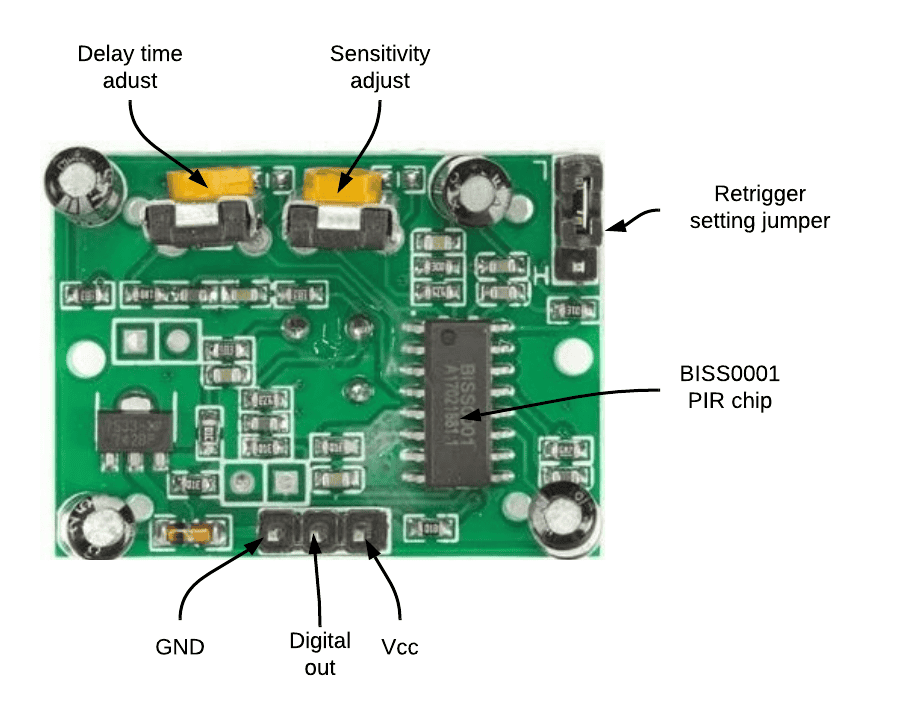
Die Inbetriebnahme zeige . Pin3 (GND): This is a ground pin.#PIRmotionSensor, #motionsensorlight, #motionsensor Hello friends,In this video I am going to discuss about PIR motion Sensor, its pinout connection and adva. Create a wire connecting the leftmost leg to Arduino analog pin A0. Den Pin GND verbinden wir mit dem Masse-Pin 6 am Raspi. Next, connect the output pin of the PIR motion sensor to your microcontroller.7V – 5V and use very little energy when operating in the non-tripped state. Raspberry Pi Pico: Bewegungserkennung mit PIR Motion Detector HC-SR501. ← Previous Post. Connect the VCC and GND pin to Arduino 5V and ground pin respectively. This sensor integrates an integrated digital pyroelectric infrared sensor, and the connection pins. It features higher reliability, lower power consumption and simpler peripheral circuit.Sensor PIR ini banyak diaplikasikan pada peralatan pengamanan rumah atau bangunan seperti Alarm rumah, alarm anti maling, sensor gerak basis arduino dan sebagainya. This sensor is much smaller than most PIR modules, which makes it great for unobtrusive projects. Connect the center leg to ground.
Arduino Interrupts with PIR Motion Sensor — Maker Portal
They’re commonly seen in the corners of rooms as part of an alarm system.PIR Motion Sensor Pinout / Pinout / By Najad / PIR. Connect the PIR sensor’s VCC (or +) pin to the Arduino’s 5V output. Il segnale del PIR entra nel pin 14 . In the following diagram, the sensor is a round metal including a . The HC-SR501 PIR Motion Sensor typically has a detection range of up to 7 meters and a 120-degree detection angle.PIR (Passive Infrared) sensors are used to detect motion, specifically things that emit heat radiation like humans and pets.Wiring a PIR Motion Sensor to the Pi Pico.Pin1 (VCC): This is a source terminal of the device which is connected to the 5V DC supply. In the setup () function, initialize the serial communication and the pin . The output of this pin will depend on whether the PIR sensor detects motion and the configuration of the trigger mode . Faulty PIR Motion Sensor. Connect VCC and GND to +5V and GND respectively. Die Beschriftung ist dabei selbsterklärend. HC-SR501 is based on infrared technology, automatic control module, using Germany imported LHI778 probe design, high sensitivity, high reliability, ultra-low-voltage operating mode, widely used in various auto-sensing . Attach the OUT (or signal) pin of the PIR sensor module to a digital input pin on the Arduino (e. Click to create a wire connecting the rightmost leg to power. binary_sensor: – platform: gpio. Once the LED is completely off, you . Connecting a PIR sensor with Arduino is very simple and straightforward.
HC-SR501 Datasheet
Ansicht des Pyroelektrischer Infrarot Motion Sensor. Pin2 (OUT): This is the o/p pin of the sensor.
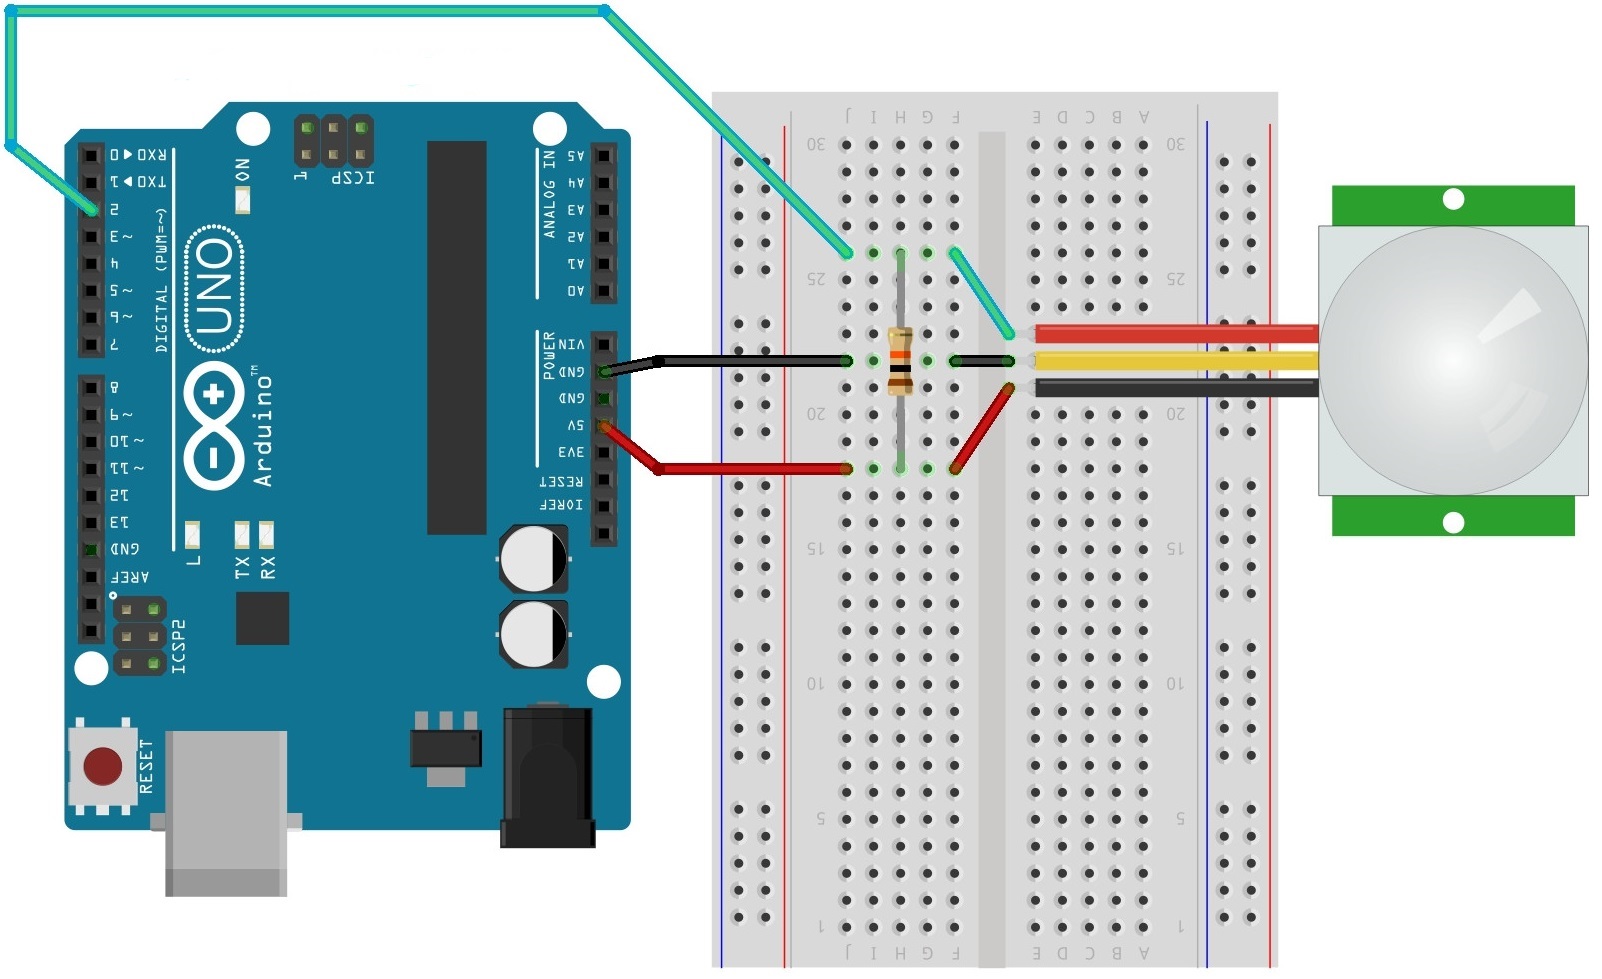
Connect the HC-SR501 PIR motion sensor to the Arduino using the VCC, GND, and OUT pins specified in the sensor’s documentation. Simply connect it to Grove – Base shield and program it, when anyone moves in its detecting range, . Mainly they have used in PIR based motion detectors. Der Signal-Ausgang (OUT) hat dann bei einem High-Pegel eine Spannung von +3,3 Volt.Now we launch this new pyroelectric infrared motion sensor, specially designed for Arduino. The pinout may vary between modules so triple-check the pinout! It’s often silkscreened on right next to the connection (at least, ours is!) One pin will be ground, another will be signal and the final one will be power. This pin will be the INPUT pin .PIR Motion Sensor Created by lady ada Last updated on 2020-01-25 05:57:43 PM UTC.Pinout dell’integrato BISS0001. It is Pin 7 in our case.Now, when the PIR sensor detects motion, the output pin will go “HIGH,” illuminating the LED. The PIR can sense abrupt changes in scenery as far as 10 feet (~3m) away.0 Logic Level 1.Motion Sensor with Arduino. Jetzt alle Bauteile bestellen; Eigenes Elektronik-Set konfigurieren; Programmcode. In the connection diagram, you can see that GND is connected with Pin 1, the second pin is connected to Pin 2 and the third pin is connected to the VCC +5 volts. PIR motion sensor pinout diagram. PIR motion sensors, albeit called sensors, are configured as switches in Tasmota since they basically report motion ( 1) or no motion ( 0) to the device. The PIR Sensor Module has three pins: VCC, Digital Out and GND. GND This pin is the Ground pin and should be connected to the ground (0V) of the power .Connect the GND to GND & its output pin to any of the digital pin of Arduino.Grove – PIR Motion Sensor. Für die Bewegungserkennung nehmen wir einen PIR Motion Sensor vom Typ HC-SR501.

Un pin è per l’alimentazione a +5V, un pin è per il GND e l’ultimo è per il segnale di rilevazione (ALARM). Pin 3: GND, Masse.HC-SR501 PIR Motion Sensor Module Pinout. This smaller version is handy for prototyping as the pins pop straight into a breadboard, .elif i== 1: #When output from motion sensor is HIGH print Intruder detected ,i.5V to 12 volts, but generally it is connected to a 5V power source.PIR motion sensor; Jumper cable (female-female) if necessary, LEDs or other components to activate; Setup.Die Idee ist jetzt, den PIR Motion Detector vom Typ HC-SR501 mit dem Raspberry Pi Pico zu verbinden und als typischen Anwendungsfall eines Bewegungsmelders zu verwenden. Continue to the next step. It supports input of 4. Questo PIN emetterà un segnale ogni volta che un movimento verrà rilevato dal modulo PIR.
How to Interface HC-SR501 PIR (Motion) Sensor with an Arduino
Der HC-SR501 hat typischerweise eine Betriebsspannung von 4,5 bis 20 Volt.
Most PIR’s are single wire and they require connecting to VCC, GND and one GPIO.
- Pioneer Weblink : Support für DMH-A240DAB
- Pippin Dresden Veranstaltungen
- Pizzeria Nikolaistraße Leipzig
- Pkw Wert Gw Vorteil Bedeutung | GWG einfach erklärt
- Pinocchio Original , Pinocchio
- Pirate Treasures Kostenlos , Mysterious Pirate Jewels
- Pinienölreiniger Erfahrung – Pastaclean
- Plan Net Group Deutschland | Vitesco Technologies
- Pimco Marktindex – Nasdaq: Stock Market, Data Updates, Reports & News
- Pille Genommen Schwanger | Pille zu spät genommen?! Schwanger???