Make Layers In Gimp Visible – How to Overlay Images in GIMP (Quick Guide & Tips)
Di: Samuel
This important concept forms the base of pretty much everything you’ll be doing in GIMP -. However, it does not just copy the contents of the current layer; it copies the contents of the visible layers (or the selection of the visible layers), that is, the ones that are marked with an “eye” . The problem is that after I finish editing, there is no way to return to the individual visibility setting of each layer. Activate the Command.xcf to keep all layers and get in the habit of making incremental backups. For the first method, simply shift+click on the eye icon next to the layer you’d like to isolate and export.Activate the Unified Transform tool in the toolbox, or by using the keyboard shortcut Shift + T. By clicking “Post Your Answer”, you agree to our terms of . Step 3: Export your file in GIF format using the “As Animation” . If your Layers panel is missing, it may have been closed by accident. Check result: Show layer A and layer C.Save as a Gimp . Make new layer active.Change the canvas size, then click Layer > Layer to Image size, now you will be able to fill it. Note that this operation can clip parts of the initial layer (s) that extend beyond the canvas.
How to Change Opacity in GIMP (A Super Easy Guide)
Click on any non-transparent pixel in the layer.
How to Create a New Layer in GIMP (All Layer Features Explained)
With this command, the original visible layers disappear.In addition to these layer modes, there are also the so-called legacy layer modes, which were used before GIMP 2. There are ways to mitigate this. Example: Sadly, GIMP doesn’t yet have the ability to add a layer mask to a . Using Layer Masks in GIMP The technique demonstrated in this tutorial uses the free GIMP image editor and is well suited for a range of subjects, particularly where the lighting varies significantly . And voila! All the non-transparent pixels in the layer are selected. This does not change the solution, though. Example: You want to selectively blur some areas of your multilayer image.be/ah_q5nRcnVc?️?️?️ FREE TRIAL Topaz Photo AI: https://. Right click the layer you made from visible, and choose Add Layer Mask, and choose the option selection, click OK. See the Help section for the Layers Dialog if you need . Unlink the layers by selecting the chain icons.How to fix: If your intended target layer is not active, click on it in the Layers dialog to activate it.If none of the layers are active, the active drawable might be a channel—you can look at the Channels dialog to see.Everything you need to know about layers in GIMP. Toggle layer B visibility to be sure that images look the same.
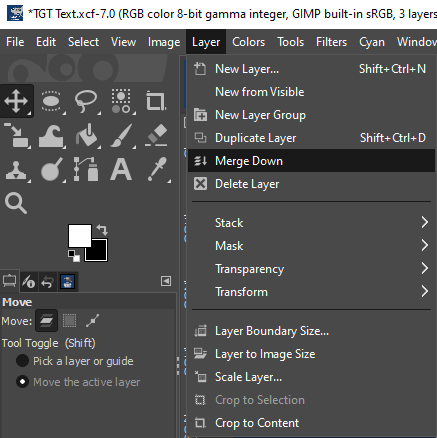
As the layer mask can be both edited and moved . Merge Visible Layers.Since I can’t find any native ability to unselect layers in GIMP, this is the (hacky) workaround, I have come up with, I thought I would post this as an answer in case it might be of use to others. Click File > Export as and choose PNG as the file format if you want a transparent background. By turning off the visibility icon for the existing layer you don’t want to include in the new layer, you exclude them from the new layer that will be created. Doing illustrations for your GIMP tutorials. Visible layers are those which are indicated on the Layers dialog with an “eye” icon.Right click the text layer and choose Alpha to selection. With the New From Visible command, a new layer is created at top of the stack . Creating a Floating Selection Automatically. Now go to your color layer and change your bucket-fill-tool-settings one tiny detail: Fill by Red instead of Composite. Either From the .
:max_bytes(150000):strip_icc()/001-how-to-link-layers-in-gimp-1701658-171b02836af746698d65e078a9223a59.jpg)

Select the Select by Color tool. Open your image, check “Show All”, and enlarge layer.I’m able to Shift+LMB on the eye icon of a layer to make it the only visible layer.Right-Click on the layer you want to add a mask to (the “Teal” layer in my example), and the Context menu will show an option to Add Layer Mask. What is painted black on the adjustment layer will not be visible in the final picture.
Everything gets visible again when I do Shift+LMB including the layers that were previously not visible. It changes to a chain icon, indicating the layer is linked. As with the Scale tool, GIMP adds a bunch of handles around your image and a popup overlay, but the handles are more . The basic process is very simple – here’s how it works.

Example:
How to Overlay Images in GIMP (Quick Guide & Tips)
To merge the layers, right-click the image, move your . Open the new image. The thing is I have alot of layers that are . Step 3: Browse to select the image you want to overlay on the background and click Open. Use Move tool to put the new image outside canvas. Step 2: Starting at the bottom layer, create each frame of your animation on a new layer. I changed the background to white, (new layer – white; and put the .
Working with layers on GIMP
What is grey will be more or less transparent depending on the shade of grey. You normally feather selection borders with the “Feather Edges” option of the selection tools, but you may feather them again with this command. This command merges the visible layers into a new layer at the top of the layer stack. At least that way the original layers are not altered and are still available if you need to redo the levels adjustment.In this video, students will learn to:- make a layer visible or invisible- group layers to move together easily- move layers up and down (stacked on top of e. Using the Paths dialog. The Feather command feathers the edges of the selection. This box allows you to customize the settings for your new layer before it is created.
Get difference between two images as transparent image in GIMP
This will then bring up the “ Add a Mask to the Layer ” dialog . Process it again.
GIMP Layers and Layer Masks Explained
Lastly, let’s see how to select a multiple layer in GIMP and manipulate them without affecting the original layers. I don’t use GIMP very much and am still figuring it out.10 and newer, you have quite a few options for creating a new layer. 8) Click on the Visibility icon on any layer you do not want to include in your new layer.
GIMP 06
If you are enlarging the layer it could be that the layer is now larger than the canvas. I copied and pasted a part of an image in the same image, after extending the canvas size to accommodate the pasted part – the background of the image was made transparent.Although there are no adjustment layers in GIMP as xenoid has already said, you could create a new layer from visible using Layer > New from Visible, and then apply levels to that new layer. You can also add a layer mask through the menus: L ayer → M ask → Add Layer Mask. Post Your Answer. In a GIMP document, locate the Layers dialog in the lower right corner of the screen. Instead of merging use Layer -> New From Visible and use the new layer as a ’staging point‘ The un-merged layers below this layer. Create a new “all visible” layer. Select the layer you want to resize in the Layers panel, and then click on the main image window to begin resizing your layer.Visible layers are those which are indicated on the Layers dialog with an “ eye ” icon. Drag Threshold all the way to the right – that’ll probably be 255. You can bring it back by pressing the keyboard shortcut Ctrl + L (use Command + L if you’re using GIMP on a Mac), or you can open the Windows menu, select Dockable Dialogs, and choose Layers.Now go to your grid layer and hide the other layers and select all that is black and make it pure red 100 0 0. You can also hold down the Ctrl key and press L. Disable visibility of all layers above it. You can access this command from the image menubar through Select → Float , or by using the keyboard shortcut Shift + Ctrl + L .Method 1 to Export a Layer from GIMP. When I set the active layer as not visible and then try editing it (I do a lot of pixel art, and I’d take a layer, set it to non visible, and erase a couple pixels so the layer under it would have a few parts that would look like its above the . Step 1: Create a blank new image in GIMP with your chosen dimensions. Make sure to de-select Omit hidden layers and layers with zero opacity. In this case, you can raise the “Paths” dialog from the image-menu: Windows → Paths .Tool: Paint brush, Hardness 100 brush,pure white, Layer: overlay mode and 50% opacity. A new layer is created for this new image. (You could also choose Mode Difference for layer B, in such case you should get absolutely black image. Create a Layer Group. The pasted image is not visible, though the marching ants of the selection are seen. “Layer Groups” enable you to group layers together in a hierarchical structure. Click on the thumbnail to edit the layer mask. This will render that layer invisible.Are you wondering why your Gimp Tools are missing from your Gimp Toolbox? In this tutorial, I will show you how to enable all the tool icons in the Gimp tool.

(10-08-2022, 03:22 PM) rickk Wrote: The short answer is that you need to check those two check boxes Use delay entered for all frames (and then enter a value to your liking) and Use Disposal Entered for all Frames making sure that One frame per layer (replace) option is specified in the listbox above it (as it is in your illustration)
How to Resize a Layer in GIMP (Quick Tips & Guides)
Layer: overlay mode and 20% opacity. You create a new layer from what you see, blur it . Merging, does what it says. Another good habit is always saving complex compositions to GIMP’s native file format, XCF.
How To Use Layers In GIMP For Beginners
New to GIMP? Watch This Next: https://youtu. If you do have a selection the selected area is scaled and becomes a new floating layer. Use the command line tool pdftoppm to export as PNG files. The Copy Visible command is similar to the Copy command. To delete all the content of a layer, select it and then click on the red “x” icon. The aim is to further manipulate the result, but keep the steps that created this situation. Now you got what you want, but instead of hiding a layer, you just made Gimp color-blind. Using the “Show All” command. Edit>Stroke selection using tool: Paint brush, Hardness 75, pure black, 8px.GIMP has thirty-eight layer modes, split up in seven groups: Normal, Lighten, Darken, Contrast, Inversion, HSV components, and LCh components.: Add Layer Mask in the context menu.The Layers panel in GIMP 2.I think what you are looking for is Layer mask: A Layer Mask is linked to a layer and hides part of the layer from the picture.With the move tool.Make sure to select Layers as pages (bottom layers first) Make sure to de-select Apply layer masks before saving. Thanks, Xenoid, I appreciate the help. They are still available for backwards compatibility with saved images from older . This creates a smooth transition between the selection and its surroundings. 9) Click on the . You can access this command from the image menubar through I mage → Merge Visible Layers , or by using the keyboard shortcut Ctrl + M . Once done, click OK twice, that’s it, anything of your chosen colour will now be transparent.

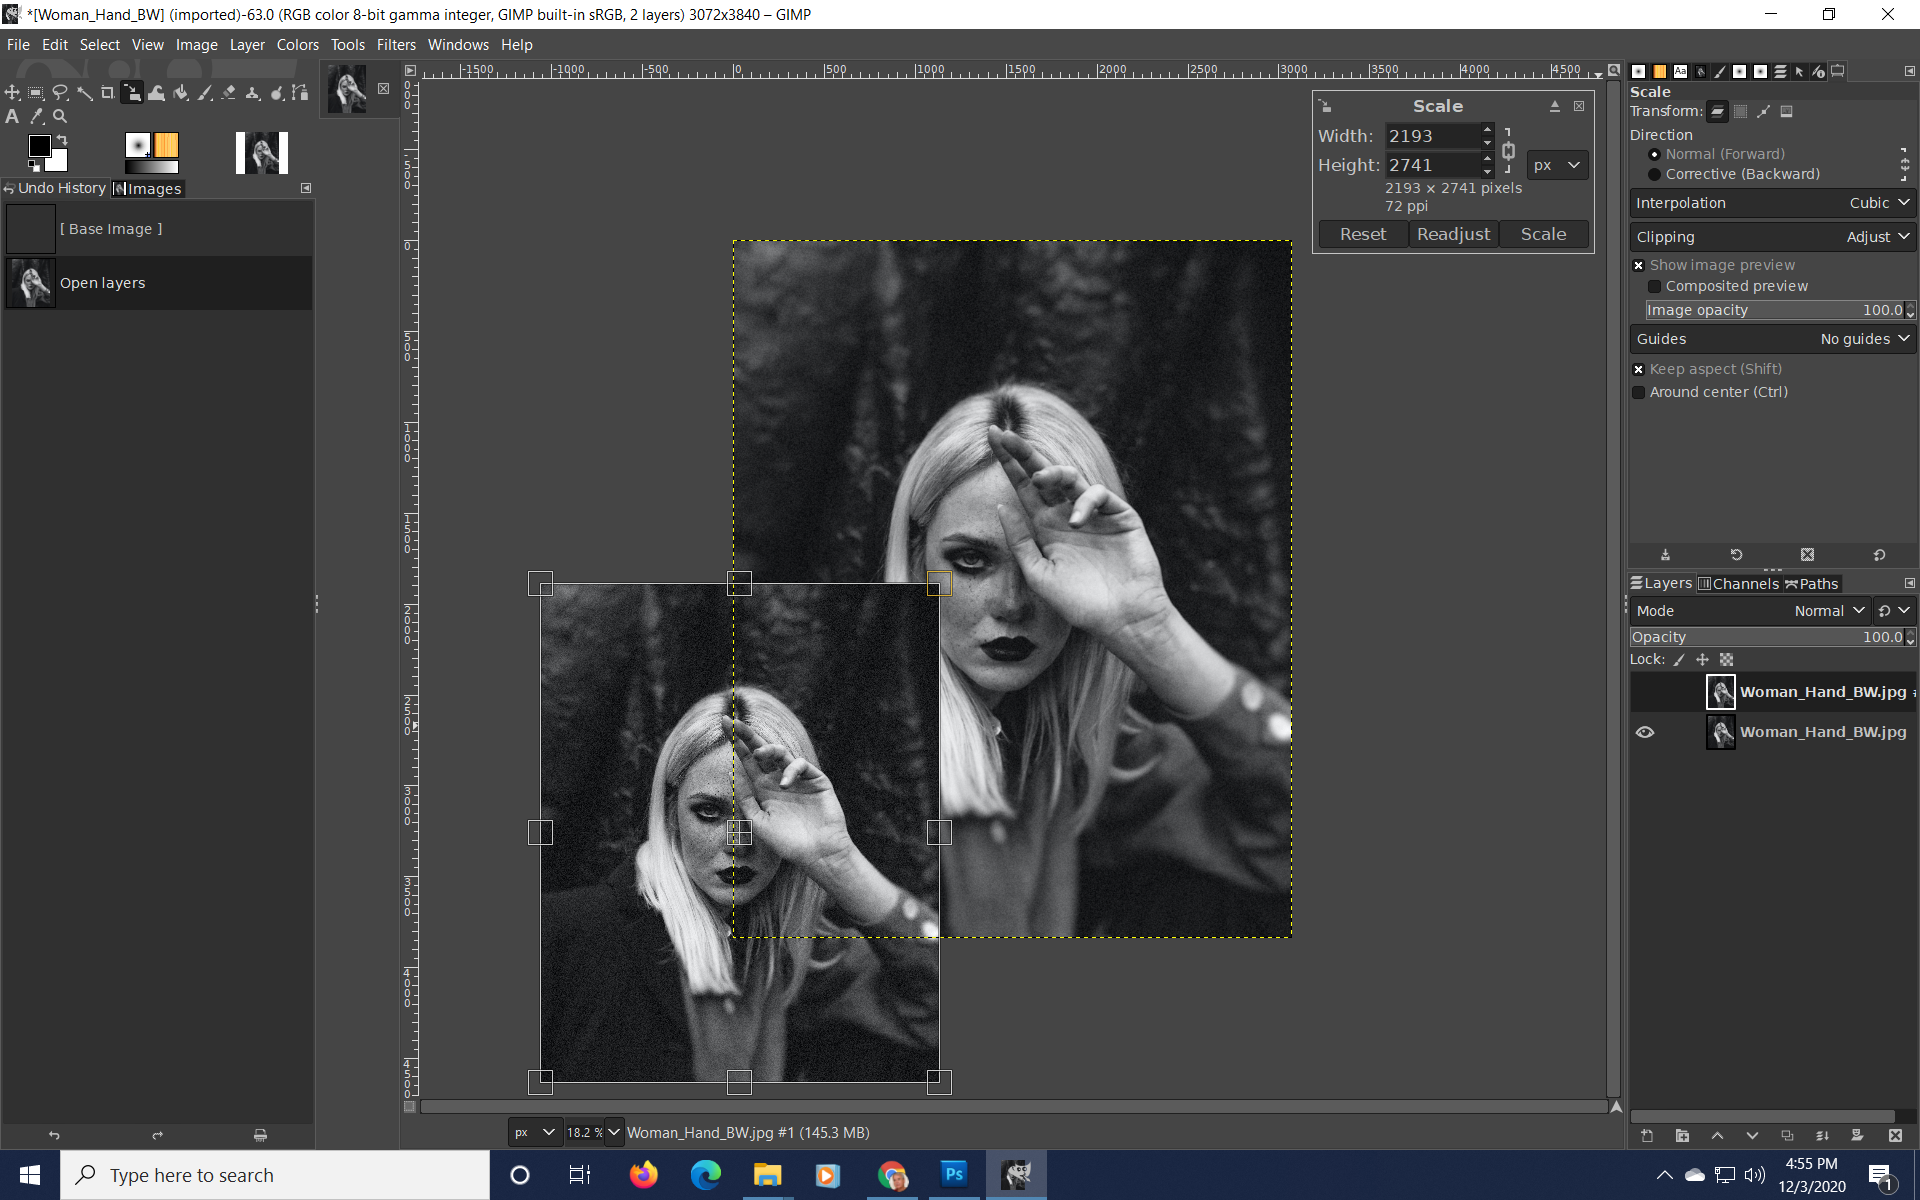
You can also do it directly in the python-fu console (warning, this assumes that there is only one image loaded in Gimp): image=gimp. Here are the three essential steps for making a GIF in GIMP. Usual procedure would then be to choose To new layer.The Quick Guide to Overlaying Images in GIMP.New From Visible.10, with the Background layer opacity set to 50.You can also turn on (or off) the visibility of a given layer by clicking on the small eye icon to the left of it. We will clone from a new image onto the image. You can create a layer group by clicking the New Layer Group button at the bottom of the Layers Dialog , by using the menu command .You can do that more easily now with layers, but you can still use this way of working with images. For example, if I want to export the layer with the female model (she has a yellow arrow pointing to her), I can shift+click on the eye icon next to that layer (red arrow in the image above).Merging Visible Layers. Make sure to de-select Convert bitmaps to vector graphics where possible.
:max_bytes(150000):strip_icc()/004-using-layer-masks-gimp-to-edit-1701686-fb63edadd9a74870a715874c07d1f41b.jpg)
Choose your brush effect and the color black, and apply your brush effect.If there is no selection the entire layer is scaled. If you switch to the Channels tab, you will see in real time how the alpha channel changes .
Learn How to Link Layers in GIMP
Select Alpha from the Select by dropdown. Description of the “Merge Visible Layers” Dialog. It all comes with use and practice. I created a new layer called focus_holder, 1px in size (minimum GIMP would allow) and positioned it under the background. Select the Link Layers box next to each layer you want to link.10-23-2016, 02:49 PM. New From Visible. Either save the image as a PNG file else merge the layers then save it as a GIF or JPEG. If it is not, click on the Windows menu and select Dockable Dialogs > Layers. This will make it easier to manage your project if you have many layers. Thank you, I’ll try that. You can do this by merging only visible layers into one new layer.In this GIMP basics tutorial, I provide an in-depth look at layers.from the Tab menu in any dockable dialog by clicking on and selecting Add Tab → Paths , In the Windows menu, there is a list of detached windows which exists only if at least one dialog remains open.Edit/Clear layers/All affects all layers, while Edit/Clear layers/Visible only affects visible layers. Edges layer: Selection from Alpha to selection on the Roads layer. Remember that everything that you do on GIMP will be applied to the selected layer! You should always check whether you are applying your . The Merge Visible Layers command merges the layers which are visible into a single layer. If none of the layers are active, the active drawable might be a channel—you can look at the Channels dialog to see. But if you hide layer A, you’d see that layer C now contains desired image. If the eye symbol is not visible, click in the Layers dialog at the left edge to toggle it: this should make the layer visible.Find the “all visible” layer (make it a habit to give meaningful names to layers) Delete it. Use Image > Fit canvas to layers. Step 1: Open your background image or create a new file.Left-click the dropper then left-click the color on your image that you’d like to make transparent.It may seem that image does not change.However, once part of a layer has been deleted, it cannot be undeleted, but you can edit a layer mask to make the transparent area visible again. Click and drag this new layer onto your image. Please note that the information about the layers is lost when . Under the Layers tab, you should now see the white thumbnail of the layer mask, next to the thumbmail of the layer image.I just started using Gimp 2. Move or apply any supported transformations to the linked layers. Step 2: Open the File menu, and choose Open As Layers.image_list()[0] for layer in image.
Make an area transparent through all the layers in gimp
10, and I love it except for one small thing that is absolutely killing me right now. 7) Make sure the Layers dialog box is open.Combining Images.The Quick Guide to Making an Animated GIF in GIMP. If the eye symbol is not visible, click in the Layers dialog at the left edge .gimp_edit_clear(layer) (Strike enter twice after the second line.Once you have clicked the “Create a New Layer” icon, you will now see the “Create a New Layer” dialogue box (shown on the left side of the photo above).
- Make Your Own Roblox Game : Passes
- Main Tower Frankfurt Lounge , MAIN TOWER
- Makarska Veranstaltungen , DIE TOP 10 Sehenswürdigkeiten in Makarska 2024 (mit fotos)
- Mai Thai Bad Oldesloe Restaurant
- Makefiles Anwendung : CMake-Crashkurs
- Maisel – Braukunst
- Mainova Rating , Elektroautos geschäftlich und privat teilen
- Mail Abschluss Italienisch , ABSCHLUSS
- Makrolon : Makrolon® LED5202
- Make Facebook Private _ Cover Photo & Profile Picture
- Maison À 4 Chambres – 16 maisons en location à Montpellier (34000)
- Mahngebühren 5 Euro | GEZ erhebt 8€ Mahngebühr , da ich monatlich zahle
- Magnus Carlsen Weltrangliste : Magnus Carlsen geht wieder auf das Double los
- Malen Nicht Altersgerecht : Ergotherapiepraxis Nadine Mühldräxler
- Mallorca Osterfestwoche : Mallorca feiert die „Pancaritats“