How Do I Set A Domain Name For My Synology Account?
Di: Samuel
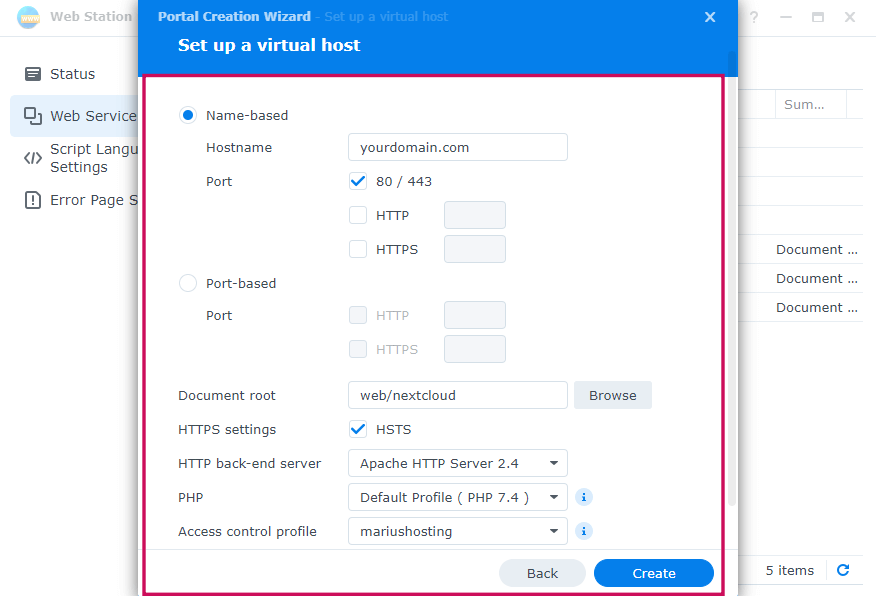
Specify a name and description for the shared folder. You can also tick Enable HSTS to force HTTPS encrypted connections on this domain.
Edit the following settings: Domain type: Select Forward Zone to perform resolution services from domain name to IP address. An HTTPS connection with a trusted certificate is required for setting up a hardware security key. It should contain two files — server.

Method 1 – get a certificate from Let’s Encrypt. A dialog box appears prompting you to edit the following settings: Service provider: Select a service provider. Set up your certificate.Administrators can also configure sync tasks to other .Find the CNAME, NS, and SRV resource record types associated with the previous server name used during domain setup. A DKIM record is added as a TXT record in the following format: Format. Domain name: Enter your registered domain name. If you have not logged in to your Synology Account, a login window will pop up. To register for a free hostname provided by Synology, choose Synology from the drop-down menu. Go to Web Station > Web Service.To create a shared folder: Go to Control Panel > Shared Folder, and click Create > Create Shared Folder. You can create and manage multiple user accounts on your Synology NAS. Keep both of these .A domain name serves as a label that represents a network location and connects to the underlying numeric IP address of a service node. Update user/group list (minutes): Set how often your Synology NAS automatically updates the LDAP user/group lists.Access emails with MailPlus. Refer to the rules for naming shared folders.
Synology NAS External Access Quick Start Guide
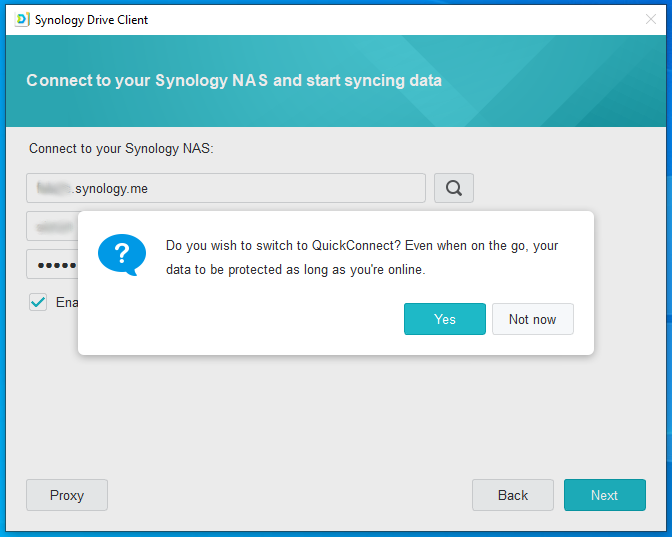
Go to the LDAP User or LDAP Group tab and click Update LDAP Data to update the lists manually. Go to Package Center to install Synology MailPlus.Register your device: After you set up DNS Server, remember to register the IP address and other required information of your DiskStation with the provider of your domain name. Launch DNS Server and go to the Zones tab. MailPlus Server . Check Enable QuickConnect. Skip this step if only one storage .Go to DSM Control Panel > Security > Certificate. Check the IP addresses configured in the A/AAAA resource records. This section is required.Host a website using Web Station. Domain password : Enter the password of the specified domain account. Hostname: Enter a registered DDNS hostname, such as . domain name @Active Directory, and click Edit > Resource record. Select Default Service and click Edit. Click Add Account.To manage advanced settings: Go to the Advanced tab to configure the following settings. Get a certificate for Synology SSL VPN and WebVPN. Specify a new QuickConnect ID.Set up DNS: A domain name is a label that identifies a network domain and functions as a link to the actual numeric IP address of a service node.zip will be downloaded to your computer.External access is the ability to remotely access your Synology NAS from any device with an internet connection.Join your Synology NAS an LDAP server.
Set up port forwarding rules on the router. Email: Enter the email address used for certificate registration. Assign a drive letter for the network drive. In DSM : Go to Control Panel > Network > Network Interface. Configure DNS records for each domain name to ensure normal mail delivery. Select the relevant DNS zone such as domain name @Active Directory or _msdcs. Click Download to proceed. Select Add a new certificate and click Next. In SRM: Go to Network Center > Internet > Connection > Manually configure DNS server. Set up WebVPN using a DDNS hostname. Enable the application portal for MailPlus. Click the Create button and select Master zone. Join your Synology NAS to an AD domain.to/example will be used. Click OK to save the settings. Consult your router manufacturer or .Before configuring DKIM, generate a public key for your mail server at the following locations: MailPlus Server > Domain > Edit > General > Advanced. This is where a notification will be sent when the certificate is about to expire. Moreover, if you need to access certain . Create identical records with your current server name and delete the old ones. DSM allows you to easily set up remote access to your Synology NAS, so you can sign in to DSM or other services by simply entering a custom domain name into your web browser. When you have multiple domains, each domain needs its own DNS settings.QuickConnect allows client applications to connect to your Synology Router via the Internet without the hassle of setting up port forwarding rules. Under the General section, you can tick Manually configure DNS server and specify a preferred DNS server along with an . Enter the following information: Domain name: Enter the domain you have registered from the domain . To allow clients to deliver emails to MailPlus Server over the Internet, you will also need to set up the MX record and A record of your Domain Name .You can get free and secure SSL/TLS certificates automatically from Let’s Encrypt, an open and well-trusted certificate authority.; Click the Create button to launch the User Creation Wizard. Consult your domain name provider for more information. On DS router: Settings > Account .Domain account: Enter the domain’s administrator account or a user account with sufficient privileges. Sign in to DSM using an account belonging to the administrators group. Select Get a certificate from Let’s Encrypt and click Next. If the domain name does not exceed 15 characters in length and complies with the NetBIOS naming . Get the login credentials of domain admin account and follow the steps below: For DSM 7
If the IP address of your NAS has changed, update the A and AAAA records associated with the previous IP address to the current one. Select Enable home service for LDAP users. Configure the back-end settings for your website: DSM 7. A customizable ID or address, such as quickconnect. Enter your existing Synology Account information or register a new account on the window. Select your network interface and click Edit.
DSM Settings
In DSM: Go to Control Panel > Network > General > Manually configure DNS server. Go to Control Panel > Domain/LDAP > Domain/LDAP. Check your Synology NAS local network router or firewall to ensure the ports 80 and 443 are correctly forwarded to your Synology NAS local IP address. Method 2 – import a third-party certificate. Otherwise, clients will be unable to query your DiskStation over the Internet. Get the login credentials of domain admin account and follow the steps below: For DSM 7 Your hardware security key will be . For more information about AD DS, please refer to this article.For domain users, AD DS allows them to access multiple Synology NAS merely using one set of credentials. Set up Synology SSL VPN using a DDNS hostname. Register DNS interface : Select the NICs (Network Interface Card) you wish to get registered with the DNS server. Put your web page files to the web shared folder on your Synology NAS. Automatic updates will affect system hibernation.Before you start. In the Location field, click the drop-down menu and select a storage on which to create the shared folder.com, its DNS server is responsible for querying the site’s IP address 210. \\IP address of NAS\(shared) folder name. 2 An example of a valid address is https://sample. Go to Control Panel > Domain/LDAP > Domain/LDAP (for DSM 7) or LDAP (for DSM 6) and make sure the Connection status is Connected.; On the Enter user information page, specify the following options: .Switch to the Profile tab 1 and click Connect under the Home Directory section. If you have multiple . You can access this shared folder via DSM File Station, SMB, etc.To enable QuickConnect: Go to Control Panel > External Access > QuickConnect. Go to LDAP User (for DSM 7) or LDAP Users (for DSM 6) and click User Home.
Synology: How to Set Up Email Using Your Own Domain Name
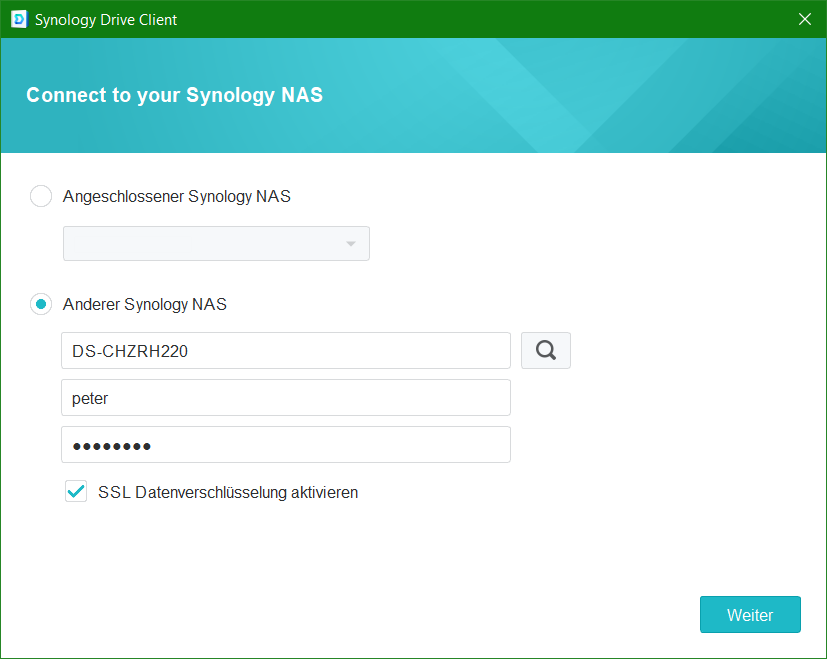
Once an administrator has enabled Synology Drive Server, users can use Synology Drive as a file portal and access it via web browsers, desktop applications, and mobile apps. Join Synology NAS to the Azure managed domain.200, allowing your Synology NAS to access the website’s information.In the Common name field, enter the domain name for accessing your Synology Unified Controller.For a list of domain registrars, you can visit ICANN.Specify an applied domain name for your Synology NAS. Join your Synology NAS to a domain. Mail Server > Security > Authentication.Check and update resource records in DNS Server: Go to DNS Server > Zones. Click More Options under the Outgoing server section to enable and set up . Configure the following settings and click Next: Server type: Select Auto-detect or Domain.Synology Drive Server is a comprehensive solution for file management, sharing, and synchronization.Outgoing Server: Enter the domain name of your Synology NAS without any prefixes. To create a user: Go to Control Panel > User & Group > User.When your Synology NAS connects to a domain name such as www. Server address: Enter the name of your .First, we’ll start by creating a master zone. Use port 587 to establish a connection via SMTP, which is the standard protocol for sending emails over the Internet. Click Done to proceed.To set up a DDNS hostname: Go to Control Panel > External Access > DDNS. Enter the path of the shared folder (or a folder under the shared folder) you want to mount as a network drive. Under the IPv6 tab, select Off from the IPv6 setup drop . You have to insert your Fixed IP on the A record. In the Email field, enter the email address for the domain name. Add a Synology DDNS hostname for your Synology Router. Name: Enter a name for the user.csr and server. Consult with your DNS provider if you encounter any issues.
How do I set up a DNS server on my Synology NAS?
Table of Contents Zones There are two ways to enter the MailPlus login page: Go to DSM Main Menu > Synology MailPlus.
Join a Domain/LDAP
Note: Each domain name can only be used for one distinct application on your Synology NAS. On a computer: SRM > Network Center > Internet > QuickConnect & DDNS.
Create
A file called archive.
With the key generated, you can get started with the DKIM record.You are required to set up a domain name for your Synology NAS if you wish to use a hardware security key to sign in to DSM. Go to Synology MailPlus Server > Account and tick the checkboxes to Activate user accounts.
- How Do You Identify A Clownfish?
- How Do I Find A Friend On A Map?
- How Do You Make A Cosmopolitan Cocktail?
- How Do I Tell Audacity Where To Find Ffmpeg?
- How Do I Get Into Gerudo Town?
- How Do You Find The Q Of A Pendulum?
- How Do You Control A Fpv Camera?
- How Do I Share My Contact Information On My Iphone?
- How Do I Convert Mp3 To Mp4? : M4A in MP3 Umwandeln (Online & Kostenlos) — Convertio
- How Do I Get A Free Trial Of Animate?
- How Do You Make A Lukewarm Fondant?