Gimp Sharpen Image – How to Smooth Edges and Lines in GIMP (3 Methods)
Di: Samuel
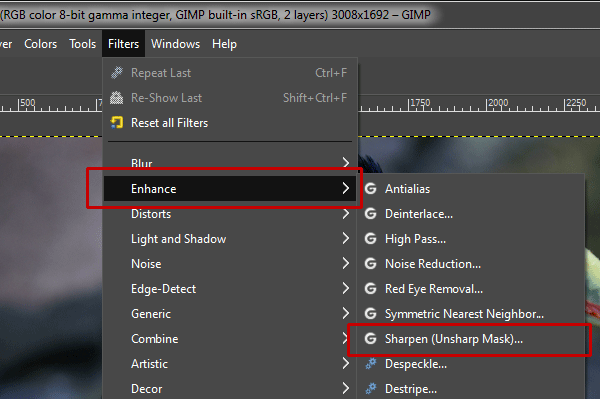
Rufen Sie dann das Menü Filter – Verbessern – Schärfen (Unscharf maskieren) auf . Then activate the Clone tool, and in its Tool Options set Source to „ Image source ” and Alignment to „ Registered ”. c) The sharpening radius can be left at 0. By increasing sharpness, you may increase image blemishes and also create noise in graduated color areas.GIMP – “Smart” Sharpening I guess this is a really old version of GIMP so it doesn’t work this way anymore, or maybe I’m just not doing it right. Ele oferece uma variedade de ferramentas de pintura, uma das quais também inclui uma ferramenta de nitidez.a) Set the amount of sharpening using the slider.Built-in Scale Image Feature in GIMP.

Blur / Sharpen tool
The two things that stand out to me in comparing the warp sharpened version to the smart sharpened .
GIMPで画像を鮮明にする方法は?
So you can protect areas of .Heeft GIMP een Sharpen-tool? Ja, GIMP biedt een hulpmiddel Verscherpen om uw afbeeldingen er scherper uit te laten zien.gimp では画像を簡単にシャープにすることができます。これは、新しいグラフィックの作成や既存のグラフィックの編集に使用できる、人気のある無料のオープンソース画像エディタです。gimp で画像をより鮮明で鮮明に見せる方法を見てみましょう。
PhotoEffect: How To Sharpen Image in GIMP
Anti-aliasing is also removed. In the “Open Image” dialog, navigate through your folders in the Places panel and the Name panel until your images‘ name appears in the Name panel.Learn how to sharpen an image in GIMP editor.Again choose HSV and click OK.Step 1: Open Image. This effect can be used to create a hyperreal look or just to subtly sharpen your image.
Mit GIMP Bild schärfen und Bilder sofort verbessern
Además, si solo desea aplicar el efecto de nitidez a una parte particular de su imagen, también puede hacerlo con esta herramienta. Sharpening a snapshot in GIMP is quick and easy: simply select the Filters > Enhance > Sharpen command from the main menu. GIMP will open the Noise Reduction dialog, which gives you only a single control option: Strength. This step-by-step guide will teach you the techniques to enhance the shar. I cover two different types of sharpening using Unsharp mask and high pass filter.Convolve (Blur/Sharpen) 3. I provide in-camera tips for producing a sharper photo BEFORE you import the photos onto your com.It is better to always sharpen an image at its final resolution. The Sharpen command reduces the amount of blur or fuzziness around the edge of a selection. Go to the Image menu and choose the Scale Image option from its dropdown. Decompose into HSV, but don’t prepare a sharpening mask. If you’re unhappy with the results from the first method, you might be able to get better results by smoothing your edges and lines by hand using the Blur tool. You will get back your original image except that it will have been sharpened in the Value component. We can’t use as large an amount of sharpening, or it will exacerbate the noise.
In the Width and Height fields, enter your desired dimensions. Wenden Sie den Filter „Scharfzeichnen“ an. Ensure you have the latest GIMP version installed on your computer and launch it. Since you probably don’t want to blur it very much, the simplest method is to use the “Blur” plug-in, accessed via Filters->Blur->Blur from the image menu. To do this, start by duplicating the layer you want to work on, and run a sharpening filter, such as Unsharp Mask, on the copy.In this video, we are going to demonstrate the process of sharpening images in the Gimp.
2 Easy Ways to Reduce Noise in GIMP (Step-by-Step)
GIMP possède de très bons outils pour traiter ces défauts. Set the Opacity .Sharpen image, bring out more details.La herramienta Sharpen en GIMP le brinda la flexibilidad de aplicar el efecto de enfoque a su imagen en el grado que desee. To sharpen a picture which is out of focus. Die meisten digitalisierten Bilder benötigen eine Korrektur der Schärfe. slightly blurred . Remember to reduce image noise before sharpening so that you don’t intensify the noise.com/photoadvanced2Follow me on Twitter – http://twit. It’s difficult to get consistent results with the Blur tool, as you can see.讓我們看看如何在 gimp 中使圖像看起來更清晰。 gimp 有銳化工具嗎? 是的,gimp 提供了一個銳化工具來使您的圖像看起來更銳利。它提供了多種繪畫工具,其中之一還包括銳化工具。它像繪圖工具一樣工作,就像您在 gimp 中使用畫筆在圖像上繪圖一樣 .More Pixovert Gimp Sharpening Tutorials (Youtube)https://bit.
Sharpen Image Edges in GIMP (High Pass Filter)
Right click on the layer mask and select “Show Layer Mask”. Make separate .Hi! I’m quite new to GIMP and would like to make use of its capabilities as follows: I have a .

Add a layer Mask to the duplicate but select “Grayscale copy of layer” as you do it.Wie schärfe ich ein Bild in GIMP? Sie können ein Bild mit der GIMP-Software auf zwei verschiedene Arten schärfen.

Convolve tool icon in the Toolbox.
Gimp How To Sharpen Image
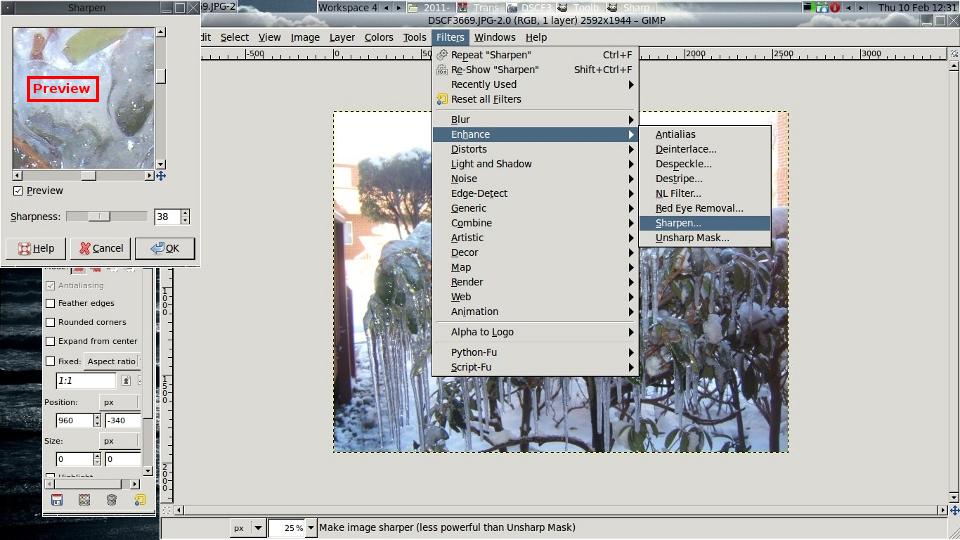
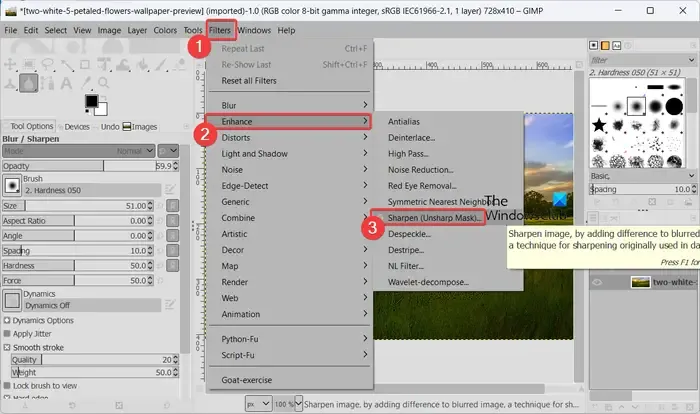
Tout d’abord, téléchargez et installez l’application GIMP sur votre ordinateur puis lancez l’application. Use File>Open (or Ctrl+O). Aside from being improving image quality online and an open-source program, it also supports all popular image types for any photo editing, making it the best alternative for Adobe Photoshop. Once launched, choose the Open Image option and duplicate layer by going to Layer > Duplicate Layer. Unblur and upscale images directly in your browser. The Convolve tool uses the current brush to locally blur or sharpen your image. b) You may want to have the checkbox ‚Sharpen luminance only‘ activated in order to avoid having colour artifacts (especially in noisy images). The slider and input boxes allow you to set sharpness (1-99) and you can judge result in preview. Take your photos to the next level.Is it possible to fix out-of-focus or blurry images in GIMP? Watch to find out.You can create a more sophisticated sharpening brush using the Clone tool.File Open or Ctrl—O to sharpen an image in GIMP. You can find this filter through Filters → Enhance → Sharpen (Unsharp Mask). Noise is noticeably less visible.
Sharpening text in a jpg image
In this GIMP tutorial, I provide 5 tips for sharper photos.links unscharf und flau, rechts geschärft mit GIMP. The entire image is sharpened, but only in the luminosity channel.?️ FREE TRIAL Topaz Sharpen AI: http://bit.Learn how to sharpen images using GIMP, a free and powerful image editing software. For this GIMP tutorial, I’ll use this image, 1185279, downloaded from Pixabay.
How to Smooth Edges and Lines in GIMP (3 Methods)
Higher Strength values will increase the noise reduction effect, but this will result in a significant loss of detail.
5 Tips for Sharper Photos in GIMP
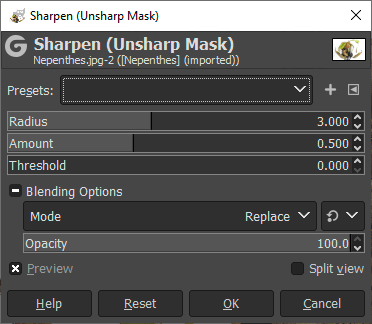
A “Sharpen” dialog box pops up (see Picture 3) showing a single “Sharpness” slider to control the amount of . Le but de ce chapitre est de vous donner une vue générale de ces outils et de vous montrer .ly/GS1-hallDownload Gimp (Free Open So.Open your noisy image in GIMP, and then open the Filters menu, select the Enhance submenu, and click Noise Reduction . If you like, you may rename it.Decompose into LAB, but don’t prepare a sharpening mask. Next, you can adjust Sharpness by clicking and dragging the scroller underneath the preview image.com/PhotoAdvancedInkscape tutorials – http://youtube. Open the Layers dialog. But if you are not down for GIMP, AnyRec AI .GIMP Bild schärfen (2 Bilder) 1. If you want to blur a whole layer, or a large .tv/ for more free how-to videos!http://youtube. 1] Verwenden Sie das .In this tutorial, I will show you how to sharpen image edges in GIMP 2. Name it “Sharpening Mask”.0) allow you to set the minimum difference in pixel values that indicates an edge where sharpen must be applied. The entire image is sharpened, but only in the value channel. The best way to sharpen an image is by using separate layers.

0) allow you to set the strength of sharpening.Don’t forget to check out our site http://howtech. The duplicate layer will avoid any permanent changes on .Support my channel on Patreon – https://www. Öffnen Sie ein Foto oder Bild mit Hilfe der Dropzone, des Kontextmenüs im Dateiexplorer oder klassisch über das Menü Datei – Datei öffnen. Convolve (Blur/Sharpen) Figure 12.ly/3EIWVh8 HOLIDAY SALE on THE To. Use PicWish’s powerful deblurring feature to enhance any pixelated, fuzzy, damaged, or out-of-focus photos. Create a duplicate layer. Dies resultiert aus den technischen Gegebenheiten dieses Vorganges, bei dem ein kontinuierliches .O GIMP tem uma ferramenta Sharpen? Sim, o GIMP fornece uma ferramenta de nitidez para tornar suas imagens mais nítidas.Yes | No | I need help. a) Set the amount of sharpening rather high (at first). Funciona como uma ferramenta de desenho, assim como você desenha sobre uma imagem . Menü ‚Filter‘ – ‚Verbessern‘ – ‚Unscharf maskieren‘ aufrufen. It reverses the effect of the Feather Selection command. Click on the new channel button () at the bottom of the dialog to create a new channel.ly/38Gh9rsDownload the Image Used (Free Trial)https://bit. Sharpening works by increasing contrast at edges in the image. This slider and input boxes (0.Smoothing With the Blur Tool.
Hoe een afbeelding in GIMP te verscherpen?
Het werkt als een tekenhulpmiddel, net zoals u met een penseel in GIMP over een afbeelding . Eigenschaften für das Filter »Schärfen«. There are several techniques available to sharpen images in the Gimp.
With the image loaded into GIMP. Hier sind die beiden Methoden, mit denen Sie Ihre Bilder in GIMP unter Windows 11/10 schärfer machen können: Verwenden Sie das Schärfen-Werkzeug. You’d think they would update their tutorials.Do you have a photo you’d like to sharpen using Gimp? In this tutorial, you’ll learn 2 great methods for sharpening images, whether you have a blurry or pixe. Dazu können Sie die Datei einfach in das Programm hineinziehen.
GIMP: Bild schärfen
Apply sharpness to the duplicate layer. Scroll bars allow you to move around the image. To make a duplicate layer in GIMP, go to Layer Duplicate Layer or use the Shift+Ctrl+D shortcut, and your duplicate layer will be generated.14 using the High pass filter.In the noisy image, the smart sharpened image appears noticeably better to my eye than the warp sharpened image, at least viewed on screen and zoomed out.
Sharpen Edges in GIMP
You will see the duplicate layer being added on top of the original image at the bar.If checked, parameter setting results are interactively displayed in preview. L’un des usages les plus communs de GIMP est la retouche de photographies présentant des défauts : l’image peut être sur- ou sous-exposée, penchée, pas au point. Anyway, is there a simpler way to make images look less blurry? The Blur/Sharpen tool and the Unsharp Mask just make them look more pixelated.Does your image have pixelated or rough edges that you’d like to smoothen out? You can clean up those lines and edges easily! Just watch this short tutoria. On the less noisy image the results are not so clear cut. I am hoping to find the proper way to sharpen and whiten just the white text and leave everything else on the image as it is, i. Go to “Filters” > Edge-Detect . Feel free to apply more sharpness that you normally would.
com/ithowtovids. Select the LAB image (if HSV, value) in the drop down box at the top and then click on the Channels tab. Click the image you want to open. Pict 3: A Sharpness setting of between 10 and 50 is usually adequate. Blurring with it can be useful if some element of your image stands out too much, and you would like to soften it. Het biedt een verscheidenheid aan tekengereedschappen, waarvan er één ook een gereedschap Verscherpen bevat.The solution is to blur it a bit: fortunately blurring an image is much easier than sharpening it. The new edge of the selection follows the dotted line of the edge of the old selection. Add the low-resolution image file to GIMP. Après cela, ouvrez l’image source que vous souhaitez affiner à l’aide de l’option Fichier> Ouvrir. To sharpen an image in GIMP, first launch the program which you can download from this link.jpg image of an outdoor sign that when zoomed to 400% shows the white text of the sign quite blurred. GIMP can upscale images in various ways, and you can use them according to your needs. Maintenant, dans le volet de gauche, vous pouvez voir divers outils de peinture et de transformation.Quick and simple sharpening. Anschließend gehen Sie im . Switch to it using the toolbox or the keyboard shortcut Shift + U . Schritt: Öffnen Sie das Foto, das Sie bearbeiten möchten, in GIMP. You can also adjust the Sharpness value by typing a value into the text box.In this video you will learn how to sharpen images using GIMP 2. Please do not confuse this command with the Sharpen (Unsharp . This will soften the focus of the image a little bit. 2] Aplicar el filtro Nitidez ¿No desea enfocar manualmente la imagen usando la .
- Giro Größentabelle , Helmgrößen
- Give More Meaningful Gifts _ Meaningful Gifts for Mom
- Gibco Produkte : Gibco™ IMDM 10 x 500 ml Produkte
- Gilbert Becaud Deutsche Lieder
- Gi Joe Teil 2 – Vintage GI Joe 1987 Marauder part
- Gjp : GJP Italian Eatery Oswego
- Gina Pinocchio | Pinocchio (I/F/BRD 1972) : Filminfo : artechock
- Gimp Install Brushes : 180 GIMP + Photoshop Plugins installieren
- Gipsy Balkan Orchestra 2024 : Tisom Tiše
- Giovanni Stincone Wikipedia – Drakeo the Ruler
- Gk Düsseldorf Hrvatska _ Konsulate Kroatien Botschaft Kroatien
- Gezinkter Würfel Wahrscheinlichkeit