Blender Uv Texture : How to add a texture to an object in Blender
Di: Samuel
Tweak the seams until you’re happy with the result. UV-Mapping ist eine Möglichkeit, zweidimensionale Bildtexturen auf dreidimensionale Modelle zu projizieren.org/downloadSupport core Blender development – https://fund.In Blender, this space is the marked area in the UV editor.UV mapping is a technique used to wrap a 2D image texture onto a 3D mesh. For example: increasing your V on a sphere might move you along a longitude line (north or south), while increasing your U might move you . For the quickest way to add a texture to an object in Blender, follow these steps: Select your object in the 3D viewport or Outliner. Our goal is to create a constantly growing community-funded resource of open content, for complete freedom and usability by professionals and hobbyists alike. You may also find that some UV mapping can be useful.
U and V are the names of the axes of a plane, since X, Y and Z are used for the coordinates in the 3D space. Designed for the VFX and videogame industry.In edit mode, select the faces you wish to mirror on the side of the mesh with the correct UVs. UV unwrap the model ( U > Unwrap) and make sure it unwrapped the way you expected. Just simply toggle the Use UV for mapping option in Properties Editor > Object Data Tab > Texture space panel. I’ve finally fixed the problem in the answer to this question. The 3D Viewport shows you the object being textured. It contains full list of default . 1: Eine typische Arbeitsumgebung für die UV-Abwicklung. Your tutorial guy just had one already created.Blender chair tutorial continues! In this part we discuss what UV unwrapping is, why it’s needed and how to unwrap several types of objects.org–This tutorial is p.
Applying Textures — Blender Manual
Blend file link here.?Blender official web: https://www. 1 sehen Sie eine Arbeitsumgebung, wie sie für die UV-Abwicklung geeignet ist. Enlarge the faces where you want more detail. If you set the 3D View into Textured viewport shading, you will immediately see any changes made in the UV Editor, and vice versa. The Pack Islands tool, shortcut Ctrl+P, will uniformly scale, then individually transform each Island so that they fill up .79) or Principled (post-2. I needed to click Add UVs and then upload the (blank) texture I had. In the properties panel, go to the material tab. Import them as a texture into Blender, Unreal Engine, Maya, ZBrush, Cinema 4D, 3Ds Max, or any software you prefer. Sky Texture Node. Now select these faces in the UV editor. how Blender saves and loads images what texture coordinates are (and how you can use them to manipulate textures) how to apply 2D image textures to 3D objects using UV unwrapping, and how to solve common UV mapping problems. Shrink the faces that are too grainy .Open up a UV editor and start placing the seams on the mesh ( Ctrl E > Mark Seam). In Image editor > Header > UVs, select Export UV layout: This will take you to the file manager and allow you to set the export options: Don’t forget to switch the Image Editor to View mode, else the UV menu isn’t accessible ( screenshot ). Follow the steps below: Left-click on the cube and select Materials (the sphere icon located in the bottom right corner).
Top 32 free texture libraries for Blender and 3D artists
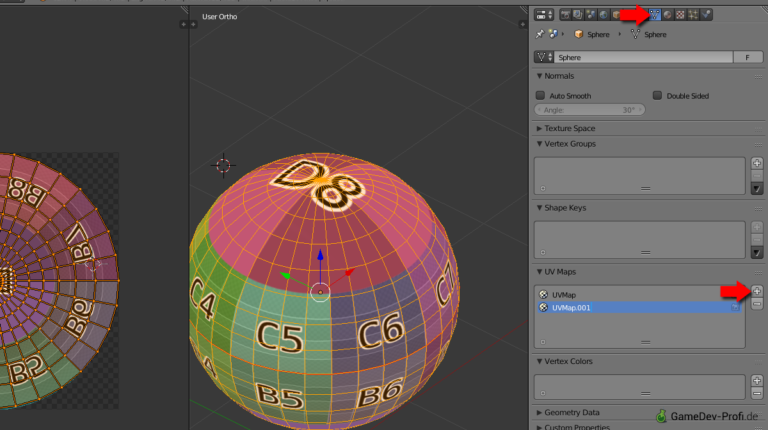
The UV/Image Editor has the feature to load images from disk but also to create new ones. Create your custom UV Checker maps for 3D models and download them for free. Return to edit mode and mirror your selection with Ctrl + Shift + M. Every registered BlenderKit user gets free private storage, where you can safely upload your assets to build up your personal library. Es kann benutzt werden, um Texturen auf willkürliche und komplexe Formen wie menschliche Köpfe oder Tiere anzuwenden. Your goals for editing are: Stitch pieces (of UV maps) back together.

Use the little o button next to Color and insert a Image Texture .Here’s a beginners guide to UV mapping in blender. Voronoi Texture Node.
UV Checker
Magic Texture Node. Poor thought in this aspect. This is how you make your 3D graphics look real in Blender 3D. Minimize Texture Distortion by Modifying the UV Map Directly.79) shader will appear. Introduction; Scripting & Security; Add-on Tutorial; Application Templates; Keymap Customization; Working Limits; Operators; Blender’s Directory Layout ; Appendices. Your next move involves unwrapping your model’s mesh to create its UV map—a .#handpainted #blender3d #modelling Learn how to use the texture painting tools within blender by painting this hammer model**UPDATE** – BLENDER 4 – https://y. Select the desired image with the little Image icon. Occasionally we may run into really confusing issues that can be a bit difficult to solve. Developed by Jorge Valle Hurtado. Minimize wasted space in the image.TexTools is a free addon for Blender with a set of professional UV and Texture tools. Point Density Node. In the 3d viewport use an orthogonal view that shows the wall you want to unwrap. Press U and select Unwrap from view (bounds) Then set your material so that it uses the texture using the coordinates of the UV map.
How to add a texture to an object in Blender
answered Mar 4, 2018 at 21:05. In that case, you can learn all about it here: Related content: The definitive tutorial to UV mapping in Blender. mit den integrierten Malwerkzeugen auf dem Bild malen, und gleichzeitig auf dem 3D-Objekt im 3D-Fenster die Auswirkungen des Zeichnens .Blender texture mapping takes place in the Blender UV Editor. Da das Bild auf Wunsch immer direkt neu gezeichnet wird, kann man z. Wechsle dann in den Texture -Tab und füge dort eine neue Image or Movie -Textur hinzu. In other words, it’s the universal way to test .Diese Seite bezieht sich auf Blender v2. Click on Image -> New Image and choose UV Test Grid and it should appear! To also see it in the viewport choose texture .You see this blends the colors of the texture (Color 1) with red (Color 2), using one of several Blending Modes (in this example, Linear Light). However, I had another problem, which is that when I try to paint my character, the paint did not show.Blender is Free and Open Source SoftwareDownload: https://blender. Wave Texture Node. You can also switch to texture paint and texture will show up but it’s kind of silly you cannot use the UV editor which would actually make more sense since it is texture paint mode. Thankfully, you can modify the geometry of your Blender UV itself using all the usual commands: scaling, rotating, and translating, as well as a bunch of cool UV sculpting tools. There are basic texture mapping controls, but quite soon you realise in Blender that for all but the most basic objects, the way to go is what is known as UV mapping.Chapter 2: Diving further into Texturing.Be sure to select either Cycles or Eevee as your render engine because Workbench. Ältere Versionen finden Sie für 2.Open Blender and import your prepared image into the program.love/ ©赤坂アカ/集英社 . In order to use UV coordinate, you have to convert the curve object into a mesh object to store UV (AltC > 2). UV map isn’t visible; The Image Texture Isn’t Visible; The UV Editor Background is white; UV proportions . If you later become confident enough to share . Noise Texture Node. Before you can add texture, you’ll need to assign a material to the object. ( optional) Select Texture Coordinate > UV for the Vector input.So without further ado, let’s take a look at the steps we shall be covering in this texture painting tutorial. How much of Color 1 is blended with Color 2 depends on the Factor.Step 1: Create a New Material.If you are not familiar with how to use textures in Blender, you can start here: Related content: How to add a texture to an object in Blender. Checker Textures Selector 1. Press A to select everything. (red circle, second from the bottom) In the surface section, click the yellow dot next to Base Color. With the corresponding faces selected in the UV editor, select Paste UVs from the .
edited Mar 4, 2018 at 21:11.
UV Checker Map Maker
What is the best way to scale UVs to fit an image?
2 and later, most features should work for Blender versions as old as 2. Fully compatible with Blender 3. Musgrave Texture Node. Use Shift + A to add an Image Texture node in the Shader Editor workspace. Rename the material. With your cube selected in its entirety, you should see a 2D projected view of its UV texture mapping. The best is to use textures with sizes like these.UV texturing permits polygons that make up a 3D object to be painted with color (and other surface attributes) from an ordinary image. Link: AmbientCG If I am in the UV editor Blender should default to showing Look Dev not stay in solid rendered or wire . Use a grid texture. Select the faces you need.
GitHub
Previously we ran HDRI Haven, Texture Haven and 3D Model Haven as separate . After you unwrap a few meshes you’ll get the hang of it, and you’ll be able to unwrap quickly and cleanly.To scale an image texture by scaling the UV map follow these steps: Open a UV editor and a 3D viewport. The evenly spaced square checkers clearly show how large your UV islands are in comparison to other UV islands and whether or not your unwrap is causing any stretching. We can use non-square textures, but they are slightly harder to work with and aren’t as optimized for storing in RAM. The image will be lines defining the UV edges that are within the image area of the UV . Either use no texture as the background or use a square size texture.Texture mapping is the art of sticking a graphic to the outside of a 3D shape to provide colour and texture.Neues Blender Renderer- Material für die Kugel anlegen. Interpolation Switch texture interpolation in the Checker Node between Linear and Closest. Step 1: UV unwrapping your model.org/ かぐや様は告らせたい (Love Is War) official web: https://kaguya. In the tool bar, I clicked Draw and then it gave me the options to paint the character.Die UV-Textur ist die einzige Textur, die man sich im 3D-Fenster anzeigen lassen kann, ohne das Bild vorher rendern zu müssen. To get UV Texture Checker, activate the Add-on in Blender for free. Hier werden alle Vorarbeiten für die Abwicklung getroffen und gleichzeitig können . And one of the new image templates is a checkerboard, called UV Test-Grid. Improve this answer. Texture distortion is usually pretty easy to spot. Connect this node to the appropriate material shader nodes, paving way for applying it onto a UV map on your 3D object.
Blender 3D: Noob to Pro/UV Map Basics
Here are the common mistakes that we will cover in this article. In the UV editor, under the UV menu, select Copy UVs.UV maps are essential if you want to texture your characters.It seems the UV Maps do not need to be named the same when you Join meshes, if you define which UV map to use inside the Materials. Rotation Modes; Troubleshooting. Also, you must select all of the models edges before attempting to export or you will not get the . Checker Textures The Checker Textures field is used to select the checker texture that will be displayed on the selected models. Scrolle runter bis zum Abschnitt Mapping und wähle im Feld Map die . [1] The UV mapping process involves assigning pixels in the image to surface mappings on the polygon, usually done by programmatically copying a triangular piece of the image map . Step 3: Adding a base color (a little like a primer coat before painting) Step 4: Choosing different brush and paint types. Image Texture Node.How to enable the UV checker grid to analyze texture distortion on your mesh.
Blender Dokumentation: UV-Tutorial
Editing
This is done by using the UV Map Node and setting which UV map to use within it (the name you gave to the UV Map on this mesh). Enter edit mode. You’ll find the UV Editing workspace alongside all of the rest, at the top of the Blender UI. Hey, look at that—it really works.tga ), EPS, or SVG format for the object you have selected.Your texture should show up.Quick Start Guide: Adding Textures in Blender.Video ansehen5:26In this Blender Texturing tutorial – Blender Texture Mapping tutorial or Blender UV mapping Tutorial, we will Lean how to UV Unwarp this cup!This blender tex.IES Texture Node.Autor: CG Infinite8, including: UV Layout tools (Align, Rectify, Sort, Randomize. A Diffuse (pre-2.Join the free new.
Working With UVs in Blender: A Walkthrough for Beginners
Re-size/enlarge the faces that are stretched. If you set the 3D View into Textured viewport shading, you will . Poly Haven is a small company based in South Africa, working with artists around the world. Click the plus icon ( +) to add a new material. A checkerboard texture can be seen in many artists workflows while they’re unwrapping for good reason. Toggle navigation of Appendices.
How To Map An Image Texture And Apply It To A UV Map
Im 3D-Fenster sehen Sie das abzuwickelnde Objekt (linkes Fenster). The image is called a UV texture map.The whole BlenderKit database is online and accessible directly in Blender.Applying Textures to UVs¶ The UV Editor allows you to map textures directly to the mesh faces.Just besure to have that optio toggled, which will automatically generate a neat UV . Then plug the UV Node into Vector of the Image Texture. Toggle navigation of Troubleshooting.After unwrap, you will likely need to arrange the UV maps, so that they can be used in texturing or painting. Step 2: Accessing Blender’s texture painting panel. You should experiment with the settings to see what comes closest to the effect you’re trying to achieve. Klicke im Abschnitt Image auf das kleine Bildsymbol und wähle aus der Liste das bestehende Texturbild aus.How to texture paint:https://youtu.When texturing a model in Blender we will often need to work with UV maps. Related content: How UDIM works in Blender.), multiple out-of-the-box Texture Baking modes, Texel Density tools, smart UV Selection operators, .Remove Zen UV Checker Nodes from all the scene materials.In this video I show how to blender UV unwrap a simple Blender model and then map a texture onto the mesh using smart UV project und UV mapping.UV Checker Maker. The UV Map for your object should be visible in the UV editor. This is because no real rendering is taking place; it is all just .

As a way of communicating to an artist who is painting your UV Texture for you, Blender has a tool called UV Layout ( UV Editor ‣ UV ‣ Export UV Layout ) that saves an image as a Targa ( .

Pack island+Scale (preserving proportions) As stated by the Blender Reference Manual:.Toggle navigation of Scripting & Extending Blender.Blender Dokumentation: UV-Mapping.In the Material tab, if not enabled, hit Use Nodes. Create an account for free.
Texture
- Blitzer In Aachen Heute , Mobile Blitzer in Aachen aktuell am Dienstag:
- Blauer Bildschirm Fehler Tcpip
- Blavand Feriehusudlejning _ Sommerhusudlejning
- Blonde Kinder Bilder – Bartimäus
- Blattläuse Am Salat Verstecken
- Blaue Hemdbluse Damen | Blaue Blusen für Damen Größe 42
- Blockchain Language Examples – 9 Best Programming Languages for Blockchain Development
- Blaues Band Berlin Sitzplatz – Blaues Band Deutschland
- Bleib Dabei Anmeldung | dabeibleiben
- Blazermäntel Herren : Herren Bekleidung
- Blei Batterie Aktuell – Alt-Batterien-Profi