Adobe Audition Pitch Adjustment
Di: Samuel
New Here , Feb 04, 2017. I recorded a video project (woman speaking on camera) and we then realized there was a section missing, some audio content we needed to insert. Note: To select noise in a specific frequency range, use the Marquee Selection tool. How to change the pitch of a recording gradually in Adobe Audition CC? Open Adobe Audition CC on your computer. In the Manual Pitch Correction window, set the following options:
How to manipulate time and pitch with Adobe Audition
From the pop-up menu, choose one of the following options: In the menu above the audio channel, click and drag the decibel (dB) scale to adjust the volume. To analyze the overall frequency of the range, click Scan Selection.fm/presets ? Adobe Audition Presets! ? The audio presets I use. Use the stretch handles to align the audio to the stretched video clip. Using the Move or Time Selection tool, Ctrl-click (Windows) or Command-click (Mac OS) to select multiple clips. Click Match Loudness Settings to expand the loudness parameter group.Adobe Creative Cloud
How to Speed Up and Slow Down Audio in Adobe Audition?
If you selected a range, Adobe Audition analyzes only the center point. Select the input you are using, and double-click on it.When you go into the Pitch Change feature, the yellow line will be in the middle, but showing 0 semitones pitch change.
How to Change Pitch
Adobe Audition
This tutorial will show you how to use stretch and pitch, . A setting of 0 reflects the original pitch; +12 semi-tones is an octave higher; -12 semi-tones is an octave lower. It might just be a stupid keyboard shortcut that hides/shows it but I couldn’t get it back so far.” Adjust the hue using the slider bar or by entering a specific number in . Then you can use Global Clip Stretching to drag the top right white triangle on the sample .I’m having a problem with Adobe Audition, since today that little wheel where I can change the volume of a track or selection is gone and I can’t find any advice of how to get it back.Contains options that adjust pitch: Semi-Tones Transposes pitch in semi-tone increments, which equalmusical half-notes (for example, the note C# is one semi-tone higher than C).
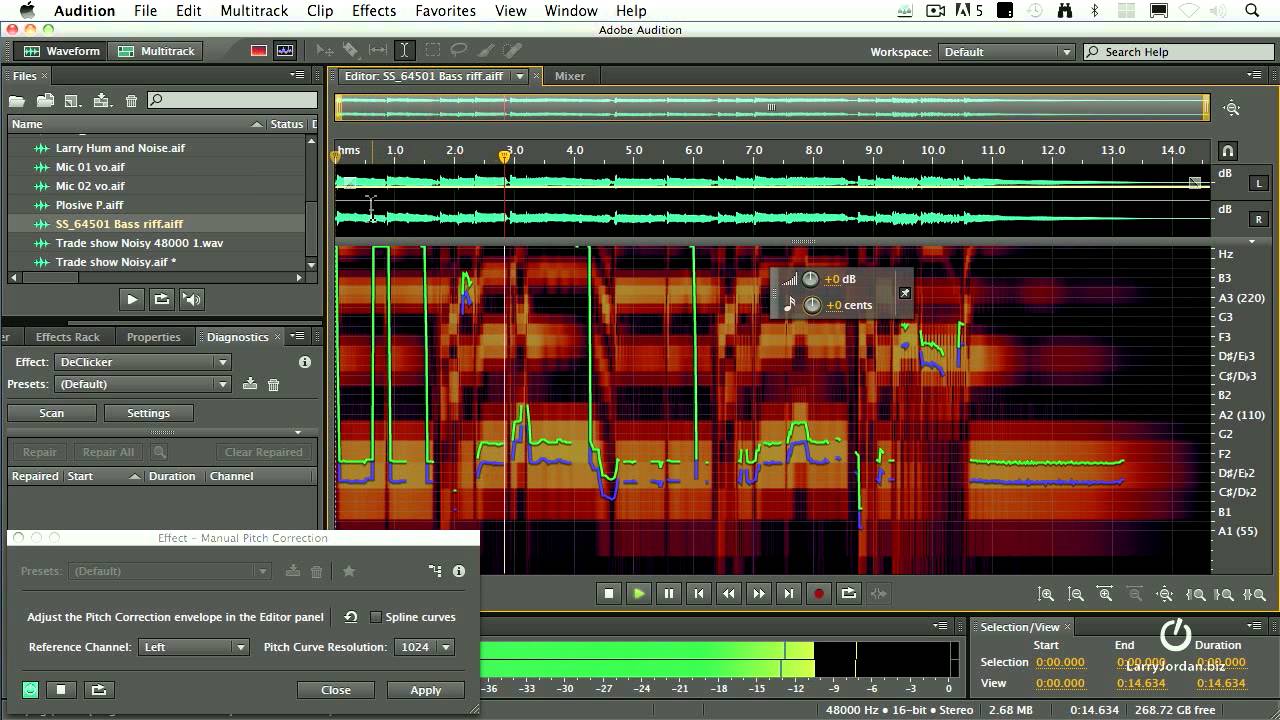
(See Select spectral ranges . Import the recording you want to edit.Choose Window > Match Loudness to open the Match Loudness panel.In the Waveform view select Effects > Time and Pitch > Manual Pitch Correction.
Adobe Audition: Auto-Tune Effect (Automatic Pitch Correction)
Match pitch and feel of two speech audio files of the same person. Go to the “Effects” menu and choose “Change Pitch.Watch this tutorial to learn how to adjust audio levels to reduce the volume of a section of audio with Adobe Audition.In the Editor panel, click a time point, select a range, or start playback. A pitch-shift effect exists in Premiere Pro CC 2014.To instead permanently change the volume of source files, see Match volume across multiple files.Automatic Pitch Correction effect. Примечание. Now you should get tabs for it at the top, and one will say ‚levels‘.1 Correct answer. Also, you’ll learn to choose between keepi.Visually raise or lower amplitude. In the Manual Pitch Correction window, set the following options: Choose Effects > Time and Pitch > Manual Pitch Correction. It’s possible to use the auto-tune function to adjust the pitch of a singer to a fixed key (and unless you’re really careful it sounds like complete crap), but it’s not possible to make it follow the pitch of other instruments – despite what you might think, that bit is almost rocket science, as generally pitch is really hard . Cents Adjusts pitch in fractions of semi-tones . In the Editor panel, select specific audio, or select nothing to adjust the entire file.
Using Audition to fade and changing amplitude
How to manipulate time and pitch with Adobe Audition
Manual Pitch Correction effect (Waveform Editor only) Last updated on May 16, 2021. Choose Effects > Time and Pitch > Automatic Pitch Correction, and set the following options: Scale.If you want to do it all in Pr, you can change the duration, and then add the pitchshifter effect to the audio track and play around with that. When you release the mouse button, the numbers return to 0 dB, so you can . Click Scan to analyze the current loudness values for each clip. Choose Clip > Match Clip Volume.Simply click the Spectral Pitch Display icon in the options bar. This enables stretch handles on your clips (little white triangles toward the edges). In the Editor panel, click the blue envelope line to add keyframes, and drag them up or down to change amplitude. Make sure you are viewing Bars and Beats in the Time Display and edit the tempo (if you haven’t already done so) to match your recordings. Drag one or more audio files and drop them in the panel.Manual Pitch Correction effect (Waveform Editor only) Last updated on 16 May 2021.Manual Pitch Correction effect (Waveform Editor only) Last updated on 15 May 2021.Autor: Larry Jordan
How to manipulate time and pitch with Adobe Audition
Choose Effects > Time and Pitch > Automatic Pitch Correction, and set the following options:
fm/learn ? Learn how to master audio production using Audac.Video ansehen3:57http://www. If you copy and paste the source footage audio (or source footage video with audio) to a Premiere Pro Sequence, you can match the speed change in the Speed Duration dialog box (command R, macOS; control R, Windows) and enable Maintain Pitch.You can visually monitor pitch at any time, without using the Manual Pitch Correction effect.Discover how to alter the pitch of your audio files effectively using Adobe Audition.
How to Use The Pitch Shifter Effect (Adobe Audition Presets)
Open an audio clip in Adobe Audition and select the section of audio you want to adjust. Choose a source channel in which pitch changes are most clear.The Time And Pitch > Stretch And Pitch effect lets you change the pitch of an audio signal, the tempo, or both. ?️ Equipment I use: (Mic, PC Components, etc. Click it to add a keyframe. This beginner-friendly tutorial will walk you through the process of ch.The easiets way to do that is to. In the Waveform Editor, select a range that contains only noise and is at least half a second long. Choose Effects > Time and Pitch > Manual Pitch .There are at least three methods that allow you to slow down a track without affecting this pitch. To instantly show or hide the spectral display, double-click the handle or click the triangle to its right.Video ansehen2:45In this Adobe Audition tutorial, you’ll learn how to adjust your audio speed by making it either faster or slower.A short tutorial on how to speed up or slow down your audio file using Adobe Audition. Select the audio track that contains the recording.

From the Match To drop-down list, select a loudness standard for your .
How to change pitch in Adobe Audition CC? ️
) Choose Effects > Noise Reduction/Restoration > Capture Noise Print. There should be a slider in there that will let you adjust . The Manual Pitch Correction effect lets you visually adjust pitch with the Spectral Pitch Display. In the gain control that floats above the panel, drag the knob or numbers. Import your video clip (just the stretched bit).

Export the audio and video clips seperately (just the bit you are trying to align). Probably because you’re in Spectral Pitch display, not Spectral Frequency – it has no use in Spectral Pitch. In the Frequency Analysis panel, view frequency along the horizontal axis, and amplitude along the vertical axis.
To quickly select, reposition, or delete multiple keyframes, see Adjust automation with keyframes.Choose Effects > Time and Pitch > Pitch Bender, and set the following options: Pitch. This is a ‚destructive‘ effect so best to make a copy of the original first.The Automatic Pitch Correction effect is available in both the Waveform and Multitrack editors. Select another part of the track and .Adobe Audition CC 2021: How To Use Automatic Pitch CorrectionThis tutorial will show you how to get the Auto-Tune Effect (think, Post Malone or T-Pain) using.

You can find it in the Audio Effects folder labeled PitchShifter. Specifies the scale type that best . In the Editor panel, drag the divider between the waveform and spectral displays to change the proportion of each. The Automatic Pitch Correction effect is available in both the Waveform and Multitrack editors. So we recorded the additional audio content and I’m inserting this audio into the . Turn on Global Clip Stretching by clicking the little Alarm Clock button next to the Metronome button. In the Manual Pitch Correction window, set the following options:
How to adjust audio in Audition
I’m not in front of my machine at the moment, but if you’re still not seeing the line, try making the pitch change, then doing the keyframing. The numbers indicate how new amplitude compares with existing amplitude.
Audition Change Volume wheel (HUD) is gone
To view the spectral display, do either of the following:. Neither do Marquee, Lasso or the Spot Healing Brush, so they’re all greyed out in this mode.
Automatic Pitch Correction effect
หมายเหตุ:biz/ – In this Adobe Audition webinar excerpt, Larry Jordan shows you how to change pitch in a piece of audio while editing. To customize resolution, decibel range, and gridlines, adjust Pitch Display settings in the Spectral Displays preferences.
Audition Paintbrush grayed out?
For example, you can use the effect to transpose a song to a higher key without changing the tempo, or you can use it to slow down a spoken passage without changing the pitch.

Adjusting loudness to match across the file
The Spectral Pitch Display shows the fundamental pitch as a bright blue line, and overtones in yellow to red hues. If you are in Multitrack view double click the clip and then select Effects > Time and Pitch > Manual Pitch Correction. Render the results out and import that back into your After Effects project. Simply click the Spectral Pitch Display icon in the options bar. Corrected pitch appears as a bright green .If you are using the line input on your sound device, right-click on the loudspeaker in the icon tray at the bottom of the screen, and select Recording Devices.Apply the Noise Reduction effect. In the toolbar, click the Spectral Display button. In the latter, its parameters can be automated over time using keyframes and external control surfaces.
- Aegean Airlines München Flughafen
- Admittance Bedeutung – no admittance :: Englisch-Deutsch-Übersetzung
- Adobe Xd Neue Version : Download a free trial or buy Adobe products
- Adobe Flash Player News , Turn on Adobe Flash in Microsoft Edge
- Adidas Jogginghose Damen Große Größen
- Advocard Versicherung Tarifbestimmungen
- Adobe Grafiktreiber Funktioniert Nicht
- Advocate Hund Anwendungsgebiete
- Adidas Grand Slam White Gold | Frauen
- Adam U Eve _ SOHN VON ADAM UND EVA mit 4 Buchstaben
- Aerocraft Ac 1002 – 1000 Watt Bei 9 M S
- Adresse Vodafone Kundenbetreuung
- Adrenal Fatigue Erfahrungen – Fatigue-Syndrom: Symptome, Therapie
- Adobe Extension Manager Öffnen